

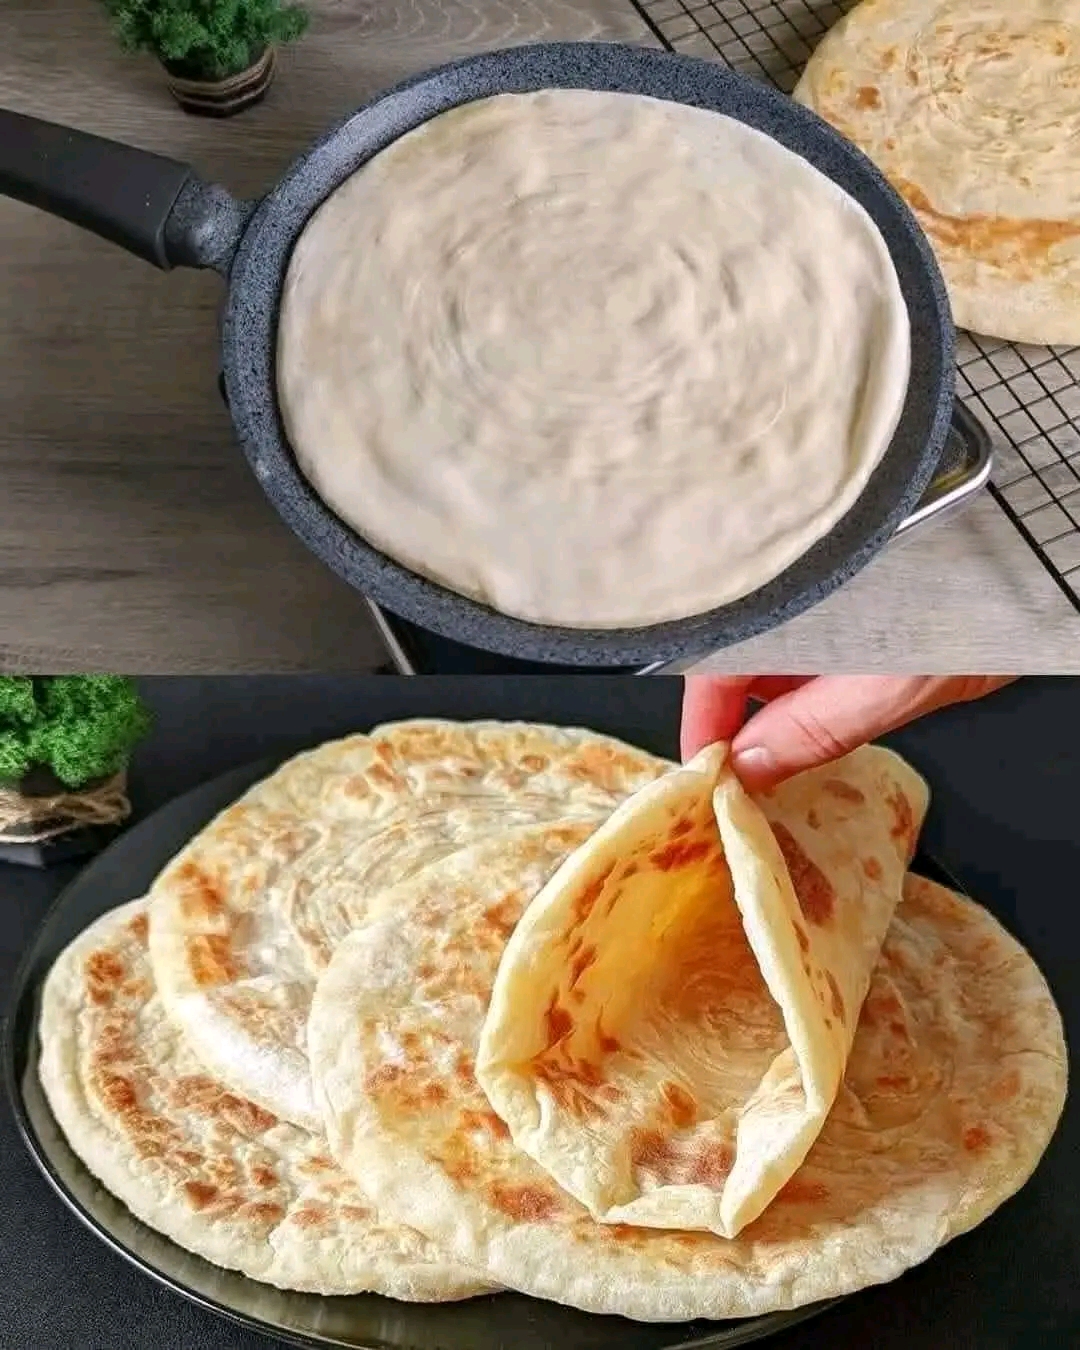
🫓 Soft Breakfast Bread Paratha
Introduction
Soft Breakfast Bread Paratha is a comforting, versatile flatbread designed for a satisfying morning meal. It combines the soft, pillowy texture of fresh bread with the delicious flaky layers of traditional paratha.
The dough is simple to prepare with everyday ingredients such as flour, yeast, warm milk, yogurt, salt, and a little oil or butter. After the dough rises, it is rolled, layered, and cooked on a hot skillet until beautifully golden.
The result is a paratha that is soft enough to tear with your hands, slightly crisp around the edges, and wonderfully tender inside.
It can be enjoyed plain or transformed into a complete breakfast with scrambled eggs, cheese, vegetables, chicken, or even a sweet filling.
🌟 Why You’ll Love This Recipe
- 🫓 Soft and fluffy texture
- ✨ Lightly crispy golden surface
- 🥛 Milk and yogurt make the bread tender
- 🍳 Perfect for breakfast sandwiches
- 🧀 Delicious with cheese and eggs
- 🥣 Great with yogurt or dips
- ❄️ Can be prepared ahead
- 🍞 Uses simple pantry ingredients
- 👨👩👧👦 Family-friendly
- 🔥 Excellent fresh from the skillet
📖 A Little History of Paratha
Paratha is a popular South Asian flatbread with a long culinary tradition. The name is commonly associated with the idea of layered or cooked dough, and the bread has developed into countless regional variations.
Traditional parathas can be plain or stuffed with ingredients such as potatoes, vegetables, cheese, or meat. They are commonly cooked on a griddle or skillet with ghee or oil.
This breakfast version takes inspiration from traditional layered paratha while incorporating yeast, milk, and yogurt. These ingredients create a softer, bread-like texture, making it especially enjoyable as a breakfast bread.
The concept of combining a soft bread texture with flaky layers also makes this recipe adaptable to many different cuisines and breakfast traditions.
🧾 Ingredients
For the Dough
- 3 cups (375 g) all-purpose flour
- 1 teaspoon instant yeast
- 1 teaspoon sugar
- 1 teaspoon salt
- ¾ cup (180 ml) warm milk
- ¼ cup (60 g) plain yogurt
- 2 tablespoons vegetable oil or melted butter
- 2–4 tablespoons warm water, if needed
For Layering
- 3 tablespoons melted butter or ghee
- 1 tablespoon vegetable oil
- 1 tablespoon flour
For Cooking
- 1–2 tablespoons butter, ghee, or oil
- Extra flour for rolling
🥣 Method 1: Preparing the Dough
Begin by placing the warm milk in a large mixing bowl.
The milk should be warm rather than hot. Extremely hot milk can interfere with the yeast.
Add:
- Sugar
- Yeast
- Yogurt
- Oil or melted butter
Mix everything together.
Add the flour gradually while mixing.
Once the dough begins to come together, add the salt.
Knead the dough for approximately 8–10 minutes.
The dough should become smooth, soft, and elastic.
If it feels too dry, add warm water one tablespoon at a time.
If it is extremely sticky, add a small amount of flour.
Try not to add too much flour because a slightly soft dough produces a much more tender paratha.
🍞 Method 2: First Rise
Lightly grease the dough with a little oil.
Place it in a clean bowl.
Cover with plastic wrap or a clean kitchen towel.
Allow it to rest in a warm place for approximately 60–90 minutes, or until noticeably puffy.
The dough does not necessarily need to double dramatically. What matters is that it becomes softer, lighter, and more elastic.
🫓 Method 3: Creating the Layers
Once the dough has risen, gently press it down to remove excess air.
Divide it into 6 equal portions.
Roll each portion into a ball.
Cover the balls and allow them to rest for another 10–15 minutes.
This short resting period makes the dough much easier to roll.
🧈 Method 4: Making the Layered Paratha
Take one dough ball.
Lightly dust your work surface with flour.
Roll the dough into a thin circle.
Brush the surface with melted butter or ghee.
Sprinkle a very small amount of flour over the butter.
Now fold the dough into layers.
One easy technique is to make several accordion-style folds, then roll the folded strip into a spiral.
Tuck the end underneath.
Gently flatten the spiral with your fingers.
Repeat with the remaining dough balls.
This process creates the characteristic flaky layers.
🌀 Method 5: Final Rolling
Take one layered dough spiral.
Dust lightly with flour.
Roll it gently into a round approximately 15–18 cm (6–7 inches) wide.
Do not press too aggressively.
The goal is to flatten the dough while preserving some of the layers.
Repeat with the remaining pieces.
🔥 Method 6: Cooking the Paratha
Heat a heavy skillet or tawa over medium heat.
Place one rolled paratha onto the hot skillet.
Cook for approximately 30–60 seconds, until small bubbles begin to appear.
Flip it.
Brush the cooked surface with a little butter or ghee.
Cook the second side until golden spots develop.
Flip again and lightly press the edges with a spatula.
Continue cooking until both sides are golden and the bread is fully cooked.
Each paratha should take approximately 2–4 minutes.
Avoid cooking over extremely high heat because the outside can burn before the inside becomes fully cooked.
✨ Method 7: Keeping the Paratha Soft
Immediately after cooking, place the paratha inside a clean kitchen towel or covered container.
This traps some of the steam and keeps the bread soft.
For an especially tender result, brush the hot paratha lightly with butter.
You can also gently clap the paratha between your hands for a few seconds. This helps separate the layers and gives it a softer, flakier texture.
🍳 Breakfast Serving Ideas
1. Egg & Cheese Paratha
Fill the warm paratha with:
- Scrambled eggs
- Cheddar cheese
- Black pepper
- Chopped parsley
- Tomato
Fold it like a breakfast wrap.
2. Mediterranean Breakfast
Serve the paratha with:
- Greek yogurt
- Feta cheese
- Olives
- Tomatoes
- Cucumbers
- Fresh herbs
3. Sweet Breakfast Paratha
For a sweet variation, serve warm paratha with:
- Honey
- Peanut butter
- Banana
- Cinnamon
- A little butter
4. Spicy Egg Paratha
Add:
- Scrambled eggs
- Chili flakes
- Onion
- Bell pepper
- Cheese
- Fresh cilantro
Fold everything inside the warm bread.
🧀 Optional Stuffed Version
You can turn this recipe into stuffed breakfast paratha.
Place your preferred filling in the center before sealing and rolling.
Cheese Filling
- ½ cup shredded mozzarella
- ¼ cup cheddar
- Black pepper
- Dried oregano
Potato Filling
- 1 cup mashed potatoes
- ½ teaspoon cumin
- ½ teaspoon paprika
- Chopped cilantro
- Salt
- Black pepper
Egg Filling
- 2 scrambled eggs
- ¼ cup shredded cheese
- Chopped green onion
- Black pepper
Be careful not to overfill the dough because excessive filling can cause it to break during rolling.
🧠 Secrets to Extra-Soft Paratha
1. Keep the dough soft
A stiff dough produces a tougher bread.
The dough should feel soft and elastic.
2. Don’t rush the resting time
Resting relaxes the gluten and makes the dough easier to roll.
3. Use yogurt
Yogurt adds moisture and tenderness to the dough.
4. Don’t overcook
Long cooking can dry out the bread.
Cook until golden and cooked through, then remove it.
5. Cover immediately
Keeping cooked parathas covered helps preserve their softness.
6. Butter while hot
A small amount of butter or ghee adds flavor and helps keep the surface tender.
❄️ Make-Ahead Method
You can prepare the dough several hours in advance.
After kneading, place the covered dough in the refrigerator.
When you’re ready to cook, allow it to sit at room temperature for approximately 30–45 minutes before shaping.
You can also prepare the shaped uncooked parathas and separate them with parchment paper.
Store them refrigerated for short-term use or freeze them for longer storage.
🧊 Freezing Instructions
Cook the parathas until they are almost fully cooked, but don’t brown them heavily.
Allow them to cool completely.
Place parchment paper between each paratha.
Transfer them to a freezer-safe bag or container.
When you’re ready to eat one, cook it directly from frozen on a medium-hot skillet until hot and golden.
This makes an excellent make-ahead breakfast.
⏱️ Timing
Preparation: 25 minutes
First rise: 60–90 minutes
Second rest: 10–15 minutes
Cooking: 2–4 minutes per paratha
Total active preparation: Approximately 35–45 minutes
Yield: 6 medium parathas
📊 Approximate Nutritional Information
Per plain paratha, assuming 6 servings:
- Calories: approximately 300–330 kcal
- Protein: 7–8 g
- Carbohydrates: 42–46 g
- Fat: 11–14 g
- Fiber: 2–3 g
- Sugar: 2–3 g
- Sodium: approximately 350–450 mg
The actual nutrition will vary depending on the amount of butter, oil, yogurt, milk, and flour used.
Adding cheese, eggs, meat, or sweet toppings will increase the calories and other nutritional values.
🌅 Perfect Breakfast Combination
For a balanced and satisfying breakfast, serve one soft paratha with:
2 eggs + Greek yogurt + fresh tomatoes + cucumber + a piece of fruit.
The combination provides carbohydrates from the paratha, protein from the eggs and yogurt, healthy fats from the cooking fat, and vitamins and minerals from the vegetables and fruit.
❤️ Who Will Love This Recipe?
This recipe is especially loved by people who enjoy:
- Homemade bread
- Soft flatbreads
- Flaky paratha
- Easy breakfast recipes
- Egg sandwiches
- Savory breakfast foods
- Homemade Indian-inspired breads
- Make-ahead breakfasts
- Comfort food
- Fresh skillet breads
It is also a great recipe for families because the same basic paratha can be served differently for everyone.
One person can enjoy it with eggs, another with cheese, and someone else can enjoy it with honey.
🍽️ How to Serve
Serve the paratha hot and fresh directly from the skillet.
For a savory breakfast, pair it with:
- Fried or scrambled eggs
- Cheese
- Yogurt
- Hummus
- Avocado
- Tomatoes
- Olives
- Pickles
- Fresh herbs
- Spicy sauce
For a sweet breakfast, try:
- Honey
- Peanut butter
- Banana
- Cinnamon
- Date syrup
- Jam
📝 Formation of the Perfect Paratha
The characteristic texture comes from the way the dough is handled.
First, the yeast and yogurt help create a soft dough.
Next, resting allows the dough to relax.
Butter or ghee is spread between layers.
The folding and rolling process creates thin layers of dough separated by fat.
When the paratha reaches the hot skillet, moisture turns into steam while the fat helps separate the layers.
The result is a bread that is soft inside, flaky throughout, and lightly crisp outside.
⚠️ Common Mistakes
Using too much flour
Too much flour makes the paratha dry.
Skipping the resting period
Unrested dough can shrink while rolling and become difficult to work with.
Rolling too aggressively
Excessive pressure can destroy the layers.
Using extremely high heat
The exterior may burn while the center remains undercooked.
Leaving cooked parathas uncovered
They can lose moisture quickly and become chewy.
🥇 Chef’s Method for the Best Results
For the softest breakfast paratha, use warm milk + yogurt + a little oil in the dough, followed by a generous resting period.
For the flakiest layers, use melted ghee or butter between the rolled layers.
For the best texture, cook over medium heat and brush the finished paratha lightly with butter.
Finally, keep the cooked parathas covered until serving.
Conclusion
Soft Breakfast Bread Paratha is a wonderful combination of homemade bread and traditional layered flatbread. The dough is enriched with milk and yogurt for tenderness, while butter or ghee creates delicate layers that become beautifully golden on the skillet.
Whether you fill it with eggs and cheese, serve it alongside yogurt and vegetables, or enjoy it with honey and banana, this paratha can easily become a breakfast favorite.
The best part is that it is soft, comforting, versatile, freezer-friendly, and easy to customize.
Fresh from the skillet, with a little butter melting over the golden surface, it is hard to resist.
Make a batch, keep them warm, and turn an ordinary breakfast into something special. 🫓❤️