

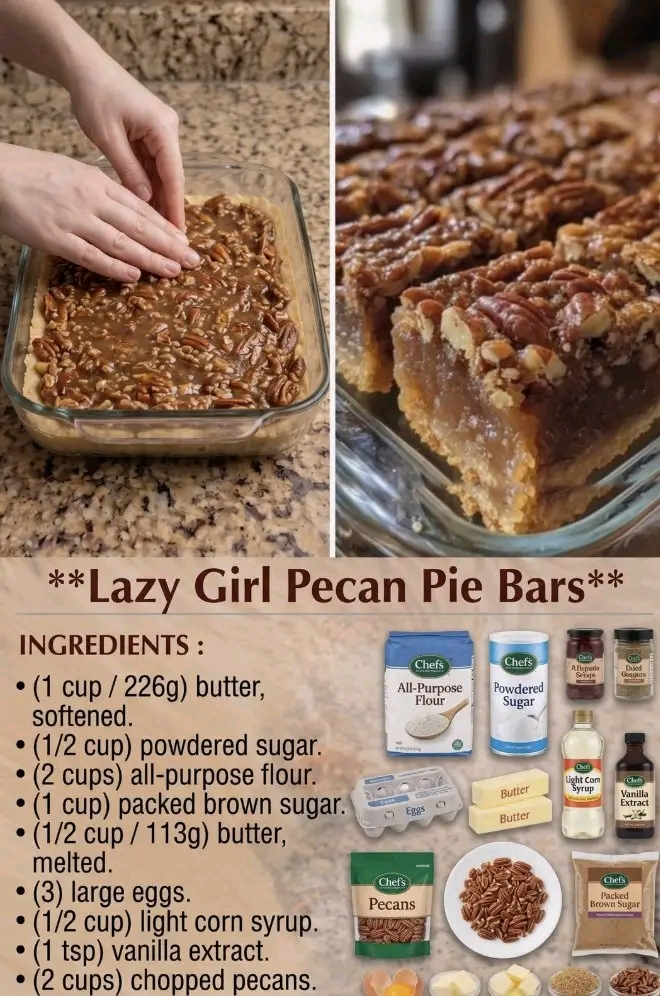
Lazy Girl Pecan Pie Bars
Introduction
If you love classic pecan pie but don’t always have the time—or patience—to make a traditional pie, these Lazy Girl Pecan Pie Bars are the perfect answer. They have everything you love about pecan pie: a buttery crust, toasted pecans, a sweet caramel-like filling, and a wonderfully chewy center, all transformed into easy-to-slice bars.
These bars are especially wonderful for holidays, family gatherings, bake sales, potlucks, church dinners, and weekend treats. They’re easier to transport than a whole pie, can be prepared ahead of time, and make beautiful little squares that disappear quickly from a dessert table.
The best part? The recipe begins with a simple three-ingredient shortbread-style base. No complicated pie crust rolling, crimping, or worrying about perfect edges is required.
Ingredients
For the Base
- 1 ½ cups all-purpose flour
- ½ cup unsalted butter, softened
- ¼ cup powdered sugar
For the Pecan Filling
- 1 cup packed light brown sugar
- ½ cup granulated sugar
- ½ cup unsalted butter, melted
- ½ cup light corn syrup
- 3 large eggs
- 1 teaspoon vanilla extract
- ¼ teaspoon salt
- 1 ½ to 2 cups chopped pecans
- ½ teaspoon cinnamon, optional
Optional Toppings
- Whole pecan halves
- A light sprinkle of flaky sea salt
- Powdered sugar for dusting
- A drizzle of melted chocolate
- Vanilla ice cream for serving
Instructions
Step 1: Prepare the Oven and Pan
Preheat your oven to 350°F (175°C).
Line a 9×13-inch baking pan with parchment paper, leaving a little overhang on the sides. This makes it much easier to lift the finished bars from the pan before cutting.
Lightly grease the parchment paper.
Step 2: Make the Buttery Base
Place the softened butter and powdered sugar in a mixing bowl.
Beat or mix until the butter becomes smooth and creamy.
Gradually add the flour and mix until a soft, crumbly dough forms.
The mixture may look slightly crumbly at first, but it should hold together when pressed between your fingers.
Step 3: Form the Crust
Transfer the dough into the prepared baking pan.
Using your fingertips, the bottom of a measuring cup, or the back of a spoon, press the dough evenly across the bottom of the pan.
Try to make the layer as even as possible so the bars bake uniformly.
Step 4: Bake the Base
Place the pan in the preheated oven and bake for approximately 15–18 minutes, or until the edges are lightly golden.
Do not overbake the crust at this stage. It will continue baking with the pecan filling.
Remove the pan from the oven and allow the crust to cool slightly while preparing the filling.
Making the Pecan Filling
Step 5: Combine the Sugars and Butter
In a large bowl, whisk together the melted butter, brown sugar, and granulated sugar.
Mix until smooth and well combined.
The brown sugar gives the filling a deeper caramel flavor and helps create that delicious chewy texture associated with classic pecan pie.
Step 6: Add the Eggs
Add the eggs one at a time, whisking well after each addition.
Then add the vanilla extract and salt.
If you’re using cinnamon, add it at this stage as well.
Mix until everything is smooth.
Step 7: Add the Pecans
Fold the chopped pecans into the filling.
For an especially attractive presentation, reserve a handful of whole pecan halves to arrange across the top before baking.
Assembly
Step 8: Pour Over the Crust
Slowly pour the pecan filling over the warm baked crust.
Use a spatula to spread the mixture evenly from corner to corner.
If desired, arrange a few pecan halves over the surface for a beautiful bakery-style finish.
Final Baking Method
Step 9: Bake Until Set
Return the pan to the oven and bake for approximately 25–35 minutes.
The center should look set around the edges while remaining slightly soft in the middle.
The filling will continue to firm as it cools, so avoid waiting until the center becomes completely firm in the oven.
If the top begins browning too quickly, loosely cover the pan with aluminum foil for the remainder of the baking time.
Cooling Method
Step 10: Let the Bars Cool Completely
This is one of the most important steps.
Allow the bars to cool completely in the pan before slicing.
For especially clean cuts, refrigerate them for about 1 hour after they have cooled to room temperature.
Once chilled, lift the entire dessert from the pan using the parchment-paper handles.
Place it on a cutting board and slice into squares or rectangles.
Cutting Method
For neat bakery-style bars, use a sharp knife.
Wipe the knife clean between cuts if you want particularly clean edges.
You can make:
- Small bite-sized squares for parties
- Medium dessert bars
- Larger pieces served with ice cream
History of Pecan Pie
Pecans are deeply associated with Southern American cooking, where pecan trees grow naturally and the nuts have been used in desserts, candies, cakes, and pies for generations.
Traditional pecan pie became especially popular in American Southern kitchens during the late 19th and early 20th centuries. The classic dessert combines pecans with a sweet syrup-based filling and a pastry crust.
Pecan pie bars take those same familiar flavors and turn them into a more convenient dessert.
Instead of rolling out a traditional pie crust and worrying about making a perfect pie, the crust is simply pressed into a baking pan. The filling is poured directly over it, baked, cooled, and sliced.
That’s exactly why these bars earn their playful nickname: “lazy girl” pecan pie bars.
They’re not really lazy—they’re simply smart and wonderfully easy.
Formation of the Bars
The magic of these bars comes from the contrast between the two layers.
The Base
The flour, butter, and powdered sugar create a tender shortbread-like crust. Because the dough is pressed directly into the pan, there is no need to roll it out.
The Filling
The brown sugar, butter, eggs, vanilla, and pecans create a rich, sweet filling with a soft and chewy texture.
The Pecans
Pecans provide a wonderful buttery crunch that balances the sweetness of the filling.
The Finished Dessert
After baking and cooling, the filling becomes firm enough to cut while remaining pleasantly soft and chewy.
Tips for Perfect Pecan Pie Bars
Use softened butter for the crust
Softened butter makes the base easier to mix and press into the pan.
Don’t skip the parchment paper
The parchment makes removing and slicing the bars much easier.
Don’t overbake
Overbaking can make the filling dry and hard. The center should have a slight softness when the bars first come out of the oven.
Let them cool
Cutting the bars while they’re hot can cause the filling to spread. Cooling allows everything to set properly.
Toast the pecans
For an extra layer of flavor, lightly toast the pecans before adding them to the filling. Let them cool before mixing them in.
Add flaky salt
A tiny sprinkle of flaky sea salt on top can beautifully balance the sweetness.
Serving Suggestions
These pecan pie bars are delicious all by themselves, but they become even more special when served warm or at room temperature with:
- Vanilla ice cream
- Whipped cream
- Caramel sauce
- A dusting of powdered sugar
- A drizzle of chocolate
- A cup of coffee
- Hot tea
- Cold milk
For holidays, place the bars on a large serving platter and decorate with a few whole pecans.
Storage
Store completely cooled pecan pie bars in an airtight container.
They can be kept at room temperature for a short period or refrigerated for longer storage.
If refrigerated, allow them to sit at room temperature for a few minutes before serving so the filling can soften slightly.
They can also be prepared ahead of time, making them an excellent dessert for busy holiday meals and gatherings.
Make-Ahead Method
One of the biggest advantages of these bars is how well they work as a make-ahead dessert.
Bake the bars a day before your gathering, allow them to cool completely, cover them, and refrigerate.
When you’re ready to serve, simply cut them into squares and arrange them on a platter.
This makes them particularly convenient for Thanksgiving, Christmas, potlucks, family reunions, and bake sales.
Why Everyone Loves These Bars
There is something incredibly comforting about the combination of buttery shortbread and sweet pecan filling.
They’re familiar enough to remind people of classic homemade pecan pie, but easy enough that you don’t need advanced baking skills.
They’re also perfect for sharing.
Instead of serving one pie to a group, you get a whole pan of individual treats.
And that’s why these bars are so dangerous at gatherings—you may want to save some for later, but chances are they’ll disappear first!
Conclusion
These Lazy Girl Pecan Pie Bars are proof that you don’t need a complicated recipe to create an impressive homemade dessert.
With a simple buttery crust, a rich pecan filling, and plenty of classic Southern-inspired flavor, they’re everything you want from pecan pie in an easier, more shareable form.
They’re perfect for holidays, potlucks, family dinners, bake sales, or simply when you’re craving something sweet and comforting.
Make a pan, let them cool, slice them into generous squares, and watch everyone reach for another one.
Just don’t be surprised if you bring an empty pan home!
For the Lovers of Easy Homemade Desserts ❤️
If you love classic desserts but don’t love complicated recipes, these pecan pie bars are made for you.
They’re buttery, gooey, nutty, sweet, comforting, and incredibly easy to prepare.
For pecan lovers: add extra pecans for even more crunch.
For chocolate lovers: add a handful of chocolate chips to the filling.
For salted-caramel lovers: finish with a light sprinkle of flaky sea salt and a drizzle of caramel.
For ice-cream lovers: serve a warm bar with a scoop of vanilla ice cream.
For holiday lovers: decorate the top with whole pecan halves before baking.
However you serve them, these little bars have all the cozy flavor of homemade pecan pie—with a fraction of the effort.