

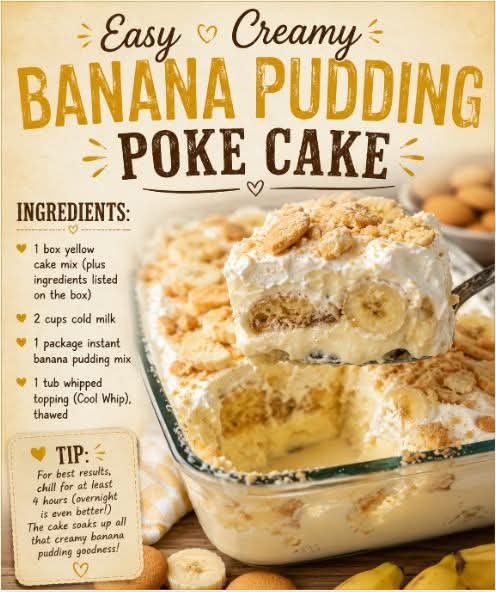
🍌 Easy Creamy Banana Pudding Poke Cake
Introduction
Some desserts are simply delicious, while others become part of the memories we carry with us for years. Banana Pudding Poke Cake is definitely one of those desserts.
This easy, creamy cake brings together everything people love about classic banana pudding and turns it into a wonderfully soft and indulgent poke cake. A fluffy yellow cake is baked until golden, poked all over with small holes, and then generously filled with smooth banana pudding. Fresh banana slices add natural sweetness and fruity flavor, while fluffy whipped topping creates a light, creamy finish. A generous sprinkle of crushed vanilla wafer cookies adds the perfect nostalgic crunch.
It is the kind of dessert that looks impressive on a serving table but is surprisingly simple to prepare.
This recipe is especially wonderful for summer family reunions, potlucks, picnics, birthdays, Sunday dinners, cookouts, holidays, and large gatherings. It can be prepared ahead of time, allowing the pudding to soak into the cake and create an incredibly moist texture.
And if you’ve ever loved traditional banana pudding, this poke cake gives you all those familiar flavors in a beautiful layered dessert.
🍌 Ingredients
For the Yellow Cake
- 1 box yellow cake mix
- Ingredients called for on the cake mix package, usually:
- 3 large eggs
- 1 cup water
- ½ cup vegetable oil
You can substitute your favorite homemade yellow cake if preferred.
For the Banana Pudding Filling
- 2 packages (3.4 ounces each) instant banana cream pudding mix
- 4 cups cold whole milk
- 1 teaspoon vanilla extract, optional
For the Banana Layer
- 4–5 ripe but firm bananas
- 1 tablespoon fresh lemon juice, optional
The lemon juice helps slow browning if the bananas will be prepared ahead of time.
For the Creamy Topping
- 1 container (8 ounces) whipped topping, thawed
- ½ cup additional whipped topping, optional for extra creaminess
For the Cookie Topping
- 1½–2 cups vanilla wafer cookies, such as Nilla Wafers
- A few whole vanilla wafers for decoration
🧁 Equipment
You will need:
- 9 × 13-inch baking pan
- Mixing bowls
- Electric mixer or whisk
- Wooden spoon handle, chopstick, or large straw for poking holes
- Spatula
- Measuring cups
- Knife
- Serving spoon
A 9 × 13-inch pan is ideal because it gives you plenty of servings for a family gathering.
A Little History of Banana Pudding
Banana pudding has become one of the most recognizable American comfort-food desserts, particularly in Southern-style cooking.
Classic banana pudding traditionally combines layers of bananas, vanilla pudding or custard, and vanilla wafer cookies, often finished with whipped cream or meringue.
As home cooks began looking for easier ways to prepare favorite desserts, the flavors of banana pudding started appearing in cakes, trifles, cheesecakes, pies, and poke cakes.
The poke cake technique became popular because it provides an easy way to transform an ordinary cake into something exceptionally moist and flavorful. Holes are made throughout the baked cake, and a filling such as pudding, condensed milk, fruit sauce, or flavored gelatin is poured over the surface.
The filling travels down into the cake, creating little pockets of flavor throughout every slice.
Combining this technique with banana pudding is a natural match.
The result is a dessert that tastes familiar, nostalgic, creamy, and wonderfully homemade.
Why You’ll Love This Banana Pudding Cake
There are so many reasons this dessert disappears quickly at gatherings.
It’s incredibly moist
The banana pudding seeps down into the cake, keeping it soft and creamy.
It’s easy
Using a boxed yellow cake mix makes preparation quick and convenient.
It’s perfect for crowds
A 9 × 13-inch pan produces plenty of servings.
It’s make-ahead friendly
The cake actually benefits from several hours of chilling.
It has amazing texture
You get fluffy cake, creamy pudding, soft bananas, airy whipped topping, and crunchy cookies in every bite.
It’s nostalgic
The combination of bananas and vanilla wafers immediately brings classic banana pudding to mind.
Step-by-Step Instructions
Step 1: Prepare the Oven
Preheat your oven to 350°F (175°C).
Lightly grease a 9 × 13-inch baking pan with nonstick spray or butter.
Set the pan aside while you prepare the cake batter.
Step 2: Prepare the Yellow Cake
Prepare the yellow cake mix according to the package directions.
Typically, this means combining the cake mix with eggs, water, and vegetable oil.
Beat the ingredients until the batter is smooth and well combined.
Don’t overmix the batter. Once the ingredients are incorporated and there are no large pockets of dry cake mix, you’re ready to bake.
Step 3: Bake the Cake
Pour the batter evenly into the prepared 9 × 13-inch pan.
Smooth the surface with a spatula.
Bake according to the cake mix directions, usually around 25–35 minutes, depending on your oven.
The cake is finished when the top is lightly golden and a toothpick inserted into the center comes out clean or with a few moist crumbs.
Remove the cake from the oven.
Step 4: Let the Cake Cool Slightly
Allow the cake to cool for approximately 10–15 minutes.
You don’t want it piping hot when you add the pudding, but you also don’t need to wait until it is completely cold.
A slightly warm cake allows the pudding to move easily into the holes.
Step 5: Poke the Cake
This is the step that turns an ordinary cake into a poke cake.
Using the handle of a wooden spoon, the wide end of a chopstick, or another round utensil, poke holes throughout the cake.
Make the holes approximately 1 inch apart.
Push the utensil down deeply, but don’t pierce completely through the bottom of the cake.
Try to distribute the holes evenly so the pudding can reach every part of the cake.
Step 6: Prepare the Banana Pudding
While the cake is cooling, prepare the pudding.
In a large bowl, whisk together:
- Banana cream pudding mix
- Cold whole milk
Whisk for approximately 2 minutes, or until the pudding begins to thicken.
Let it stand for a few minutes until it reaches a creamy but pourable consistency.
If desired, add a teaspoon of vanilla extract for extra flavor.
Step 7: Fill the Cake With Pudding
Slowly pour the banana pudding over the entire surface of the cake.
Use a spatula to spread it evenly.
Pay special attention to the holes.
Gently spread the pudding back and forth so that it settles into the holes and begins soaking into the cake.
You don’t need to force it.
Give it a few minutes and gravity will do much of the work.
🍌 Step 8: Add the Fresh Bananas
Peel and slice the bananas into thin or medium-sized rounds.
Arrange the banana slices evenly over the pudding layer.
For the freshest appearance, don’t slice the bananas too far in advance.
If you need to prepare them ahead of time, lightly toss them with a little fresh lemon juice to help reduce browning.
Step 9: Add the Whipped Topping
Spread the thawed whipped topping evenly over the banana layer.
Use a spatula to create a smooth surface.
You can leave it completely smooth or make gentle decorative swirls across the top.
The fluffy topping balances the rich pudding and moist cake beautifully.
Step 10: Crush the Vanilla Wafers
Place the vanilla wafer cookies into a sealed bag.
Gently crush them using a rolling pin or another sturdy kitchen utensil.
Don’t crush every cookie into fine powder.
A combination of small crumbs and slightly larger pieces gives the dessert better texture.
Step 11: Add the Cookie Topping
Sprinkle the crushed vanilla wafers generously over the whipped topping.
For a beautiful presentation, add a few whole vanilla wafers around the edges or arrange them in rows across the top.
The cookies provide a wonderful contrast to the soft cake and creamy pudding.
Formation of the Cake
The beauty of this dessert comes from its layers.
When sliced, you can see the different components working together:
Yellow Cake
↓
Banana Pudding Soaked Into the Cake
↓
Fresh Banana Slices
↓
Fluffy Whipped Topping
↓
Crushed Vanilla Wafers
The pudding doesn’t simply sit on top of the cake.
It travels down through the holes, creating creamy pockets throughout the cake.
This is what gives every bite its signature moist, melt-in-your-mouth texture.
❄️ Chilling the Cake
Cover the pan carefully with plastic wrap or aluminum foil.
Place the cake in the refrigerator for at least 4 hours.
For the best flavor and texture, chilling it overnight is even better.
This resting period allows the pudding to fully soak into the cake.
It also gives the bananas, pudding, cake, and whipped topping time to become one cohesive dessert.
Important Chilling Tip
If you’re preparing this dessert for a party, you can bake the cake and add the pudding ahead of time.
For the freshest appearance, consider adding the sliced bananas, whipped topping, and cookie crumbs closer to serving time.
This helps the bananas remain attractive and keeps the cookies from becoming completely soft.
How to Serve
Remove the cake from the refrigerator shortly before serving.
Use a sharp knife to cut it into squares.
For especially neat slices, wipe the knife clean between cuts.
Place each slice onto a dessert plate and garnish with:
- A vanilla wafer
- A few banana slices
- Extra cookie crumbs
- A small dollop of whipped topping
Serve chilled.
🍌 Tips for the Best Banana Pudding Poke Cake
Choose the Right Bananas
Use bananas that are ripe enough to be sweet but still firm.
Very soft bananas can become mushy between the layers.
Don’t Skip the Chilling Time
The cake needs time for the pudding to penetrate the holes and soften the crumb.
A rushed cake won’t have the same creamy texture.
Make Plenty of Holes
The holes should be evenly distributed across the cake.
This ensures that the pudding reaches more of the cake rather than remaining concentrated in just a few areas.
Don’t Overcrush the Cookies
A mixture of crumbs and small cookie pieces creates a much better texture.
Keep It Refrigerated
Because this dessert contains pudding, milk, whipped topping, and fresh bananas, it should be stored in the refrigerator.
Delicious Variations
Chocolate Banana Pudding Poke Cake
Use chocolate cake instead of yellow cake for a delicious chocolate-and-banana combination.
Strawberry Banana Version
Add thinly sliced strawberries along with the bananas for a fruity twist.
Extra Banana Version
Add another layer of sliced bananas between the pudding and whipped topping.
Caramel Banana Cake
Drizzle a small amount of caramel sauce over the whipped topping before adding the crushed vanilla wafers.
Homemade Cake Version
If you have extra time, replace the boxed cake mix with your favorite homemade yellow or vanilla cake.
Cream Cheese Version
For an extra-rich dessert, blend a small amount of softened cream cheese into the pudding mixture before spreading it over the cake.
Make-Ahead Instructions
This is an excellent dessert to prepare before a gathering.
The day before:
Bake the cake.
Allow it to cool slightly.
Poke the holes.
Prepare and spread the banana pudding over the cake.
Cover and refrigerate.
Before serving:
Add the banana slices.
Spread the whipped topping over the cake.
Add the crushed vanilla wafers.
Garnish with whole cookies.
Return the cake to the refrigerator until ready to serve.
This method keeps the dessert fresh-looking while still allowing the cake plenty of time to absorb the pudding.
Storage
Keep the finished cake covered and refrigerated.
For the best quality, enjoy it within a few days.
The vanilla wafers will gradually soften as they sit against the whipped topping and pudding, but many people actually love that softer, cake-like cookie texture.
If you prefer a crunchy topping, add fresh cookie crumbs just before serving.
Perfect for Every Gathering
This cake is especially wonderful for:
- Summer family reunions
- Backyard barbecues
- Potlucks
- Church gatherings
- Birthday parties
- Baby showers
- Holiday dinners
- Sunday lunches
- Picnics
- Family celebrations
- Afternoon coffee gatherings
It travels well when kept chilled and is easy to portion directly from the pan.
The Family Reunion Memory
There is something special about a dessert that has been present at family gatherings for years.
Maybe it sits beside potato salad, grilled chicken, fresh fruit, and homemade rolls.
Maybe everyone knows exactly which pan it is before dessert is even announced.
And somehow, no matter how much food is on the table, this banana pudding cake is the one that disappears first.
Someone takes a piece.
Then someone asks for a second.
A child sneaks a cookie from the top.
Someone else scrapes the last creamy spoonful from the corner of the pan.
And before you know it, there isn’t a single bite left.
That’s the beauty of recipes like this.
They aren’t just food.
They’re memories.
❤️ For Banana Pudding Lovers
If you’re a true banana pudding lover, this cake is practically made for you.
You get the familiar flavor of sweet bananas and vanilla wafers, but instead of being served in a bowl or trifle dish, everything is transformed into a soft, creamy cake.
The yellow cake gives you a tender foundation.
The banana pudding provides richness and moisture.
The bananas bring fresh fruity sweetness.
The whipped topping makes everything light and creamy.
And the vanilla wafers add that unmistakable classic banana-pudding flavor.
Every bite has something different.
Final Conclusion
Easy Creamy Banana Pudding Poke Cake is the ultimate combination of convenience, nostalgia, and irresistible homemade flavor.
It starts with a simple yellow cake, but the transformation happens when the cake is poked and filled with creamy banana pudding.
Fresh bananas add a delicious fruity layer, fluffy whipped topping creates a cloud-like finish, and crushed vanilla wafers bring the classic banana pudding experience full circle.
The result is a dessert that is soft, creamy, fruity, crunchy, sweet, and incredibly comforting.
Whether you’re making it because it reminds you of your grandmother, your aunt, summer reunions, or simply because your family loves banana pudding, this recipe is guaranteed to be a crowd-pleaser.
Make it ahead, let it chill, add plenty of cookies, and bring it to your next gathering.
Just don’t expect leftovers.
Because when this Banana Pudding Poke Cake hits the dessert table, the empty pan is usually the first thing you’ll see. 🍌🍰🍪❤️