

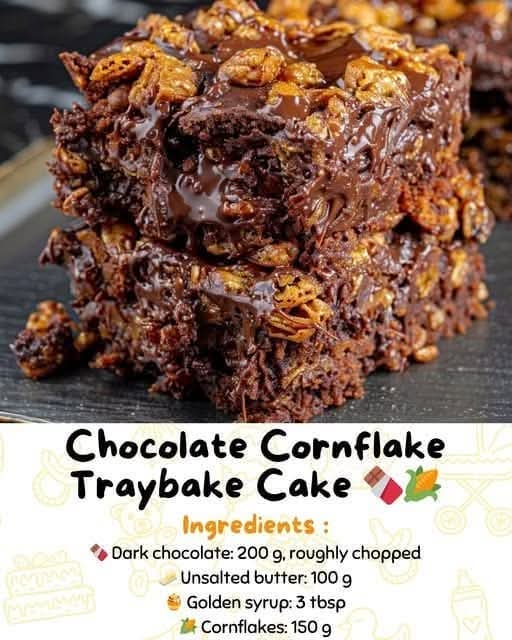
🍫🌽 Chocolate Cornflake Traybake Cake
A Nostalgic No-Bake Chocolate Treat with a Crispy Cornflake Crunch
Introduction
There are some desserts that instantly take you back to childhood, and Chocolate Cornflake Traybake is one of them. With its glossy chocolate coating, buttery sweetness, golden syrup richness, and irresistible crispy cornflakes, this simple no-bake treat is the kind of recipe that brings back memories of school dinners, family kitchens, bake sales, and afternoon treats.
The best part is that you don’t need an oven. Everything comes together in one saucepan and one mixing bowl before being pressed into a tin and chilled until firm. It is quick, inexpensive, wonderfully forgiving, and perfect when you want something sweet without spending hours in the kitchen.
The combination of chocolate and golden syrup creates a rich, smooth mixture that clings beautifully to every cornflake. Once chilled, the traybake becomes firm enough to slice while still retaining a satisfying crunch.
Whether you call it a traybake, chocolate cornflake slice, chocolate crunch, or simply a childhood favorite, this recipe is guaranteed to disappear quickly!
🍫 Ingredients
For the Chocolate Cornflake Base
- 200 g dark chocolate, roughly chopped
- 100 g unsalted butter
- 3 tablespoons golden syrup
- 150 g cornflakes
- 50 g mini marshmallows, optional
- 1 teaspoon vanilla extract, optional
- Pinch of salt, optional
Optional Toppings
For an extra-special finish, you can add:
- 50 g melted milk or white chocolate
- Chocolate sprinkles
- Mini marshmallows
- Chopped nuts
- Crushed biscuits
- Coconut flakes
- Colorful sprinkles
- A light dusting of cocoa powder
🧈 Equipment
- 20 × 20 cm square baking tin
- Baking parchment
- Small saucepan
- Large mixing bowl
- Wooden spoon or silicone spatula
- Measuring spoons
- Sharp knife for slicing
⏱️ Preparation Information
Prep Time: 10 minutes
Cooking Time: 5 minutes
Chilling Time: 1 hour
Total Time: About 1 hour 15 minutes
Servings: 16 squares
👩🍳 Instructions
Step 1: Prepare the Tin
Begin by lining a 20 × 20 cm square tin with baking parchment.
Leave a little extra parchment hanging over two sides of the tin. This will make it much easier to lift the finished traybake out once it has chilled.
Set the prepared tin aside while you make the chocolate mixture.
Step 2: Melt the Chocolate Mixture
Place the chopped dark chocolate, unsalted butter, and golden syrup into a small saucepan.
Set the saucepan over very low heat.
Stir gently and continuously until the butter and chocolate have completely melted and the ingredients have combined into a smooth, glossy mixture.
Do not allow the mixture to boil. Gentle heat is important because overheating the chocolate can make it thick or grainy.
Once everything is smooth, remove the saucepan from the heat.
If desired, stir in the vanilla extract and a tiny pinch of salt. These additions aren’t essential, but they can make the chocolate flavor even richer.
🌽 Step 3: Add the Cornflakes
Place the cornflakes into a large mixing bowl.
Slowly pour the warm chocolate mixture over the cornflakes.
Using a large spoon or silicone spatula, gently fold everything together.
Take your time with this step. You want the chocolate mixture to coat the cornflakes without crushing them.
Continue folding until almost every cornflake is covered in chocolate.
If you’re using mini marshmallows, add them toward the end and fold them through gently.
🍥 Step 4: Form the Traybake
Transfer the chocolate-coated cornflake mixture into the prepared tin.
Use the back of a spoon, spatula, or lightly greased piece of parchment to press the mixture firmly into an even layer.
Pay particular attention to the corners.
Pressing the mixture firmly helps the traybake hold together when you eventually cut it into squares.
Don’t press so aggressively that you completely crush the cornflakes—you still want plenty of crispy texture.
❄️ Step 5: Chill Until Firm
Place the tin in the refrigerator.
Allow the Chocolate Cornflake Traybake to chill for at least 1 hour, or until the chocolate has completely set.
For an even firmer texture, you can leave it refrigerated for several hours.
🔪 Step 6: Slice and Serve
Once completely set, remove the traybake from the refrigerator.
Use the parchment overhang to carefully lift the entire slab from the tin.
Place it on a chopping board and peel away the parchment.
Using a sharp knife, cut the slab into 16 squares.
For cleaner cuts, allow the traybake to sit at room temperature for a few minutes before slicing.
✨ The Formation and Texture
The magic of this recipe comes from the way the ingredients work together.
The melted chocolate provides the main structure once it cools. The butter gives the mixture a smoother, softer bite, while the golden syrup contributes sweetness and helps bind the ingredients together.
The cornflakes provide the star texture: light, crisp, crunchy, and slightly airy.
As the chocolate mixture cools, it firms around the cornflakes, creating a delicious contrast between the crisp cereal and rich chocolate.
If mini marshmallows are included, they add little pockets of soft, chewy sweetness throughout the traybake.
The result is a treat that is crunchy, chocolatey, buttery, chewy, and wonderfully nostalgic all at once.
📖 A Little History
Chocolate-and-cereal treats have long been popular in British home baking because they are simple, affordable, and require very little equipment.
Cornflakes became a household breakfast staple during the twentieth century, and home cooks soon discovered that their crisp texture worked beautifully in sweet treats. Chocolate cereal cakes and no-bake chocolate slices became especially popular with families because children could help prepare them without needing to use a hot oven.
Recipes like this became familiar at school celebrations, children’s parties, community events, family gatherings, and homemade bake sales.
The exact ingredients vary from kitchen to kitchen. Some versions use milk chocolate, others use dark chocolate, while some include raisins, coconut, nuts, marshmallows, or crushed biscuits.
That’s part of the charm: there isn’t just one perfect version. Every family can make it their own.
🍫 Chocolate Lovers’ Version
If you’re a serious chocolate lover, take this traybake to the next level.
After pressing the mixture into the tin, melt an additional 50–75 g of chocolate.
Pour it over the top and spread it into a thin, even layer.
While the topping is still melted, sprinkle over:
- Chocolate curls
- Mini chocolate chips
- Crushed chocolate biscuits
- Chopped hazelnuts
- Chocolate sprinkles
Return the traybake to the refrigerator until the topping is completely firm.
The result is an extra-rich chocolate layer sitting on top of the crispy cornflake base.
🥜 Nutty Crunch Version
For extra texture, add approximately 50 g of chopped nuts.
Good choices include:
- Hazelnuts
- Almonds
- Peanuts
- Pecans
- Walnuts
Fold the nuts into the cornflakes before adding the chocolate mixture.
The combination of roasted nuts, chocolate, and crispy cornflakes makes an especially satisfying treat.
🍚 Extra-Crispy Version
For even more crunch, replace a portion of the cornflakes with Rice Krispies.
Try:
- 100 g cornflakes
- 50 g Rice Krispies
The smaller cereal pieces fill the spaces between the cornflakes and create a lighter, crunchier texture.
🍫 Milk Chocolate Version
If dark chocolate is too intense for your taste, simply substitute milk chocolate.
You can also use a 50:50 combination of dark and milk chocolate.
This gives you a balanced chocolate flavor: rich enough for adults but sweeter and gentler for children.
🎁 Homemade Gift Method
This traybake makes a lovely homemade gift.
Once completely chilled and sliced, place each square onto a small piece of parchment paper.
Wrap individually and tie with kitchen string or ribbon.
You can arrange several pieces in a small gift box or food-safe bag.
Add a handwritten label and you have a simple homemade chocolate gift for:
- Birthdays
- Christmas
- School celebrations
- Afternoon tea
- Family gatherings
- Bake sales
- Thank-you gifts
💡 Helpful Tips for Perfect Results
Use gentle heat
Chocolate can burn easily, so keep the temperature low and stir frequently.
Don’t overmix
Fold the cornflakes gently so they remain crisp and don’t turn into crumbs.
Press firmly
A firmly packed traybake will be much easier to slice.
Chill completely
Don’t rush the chilling stage. The chocolate needs enough time to firm up.
Use parchment
The parchment makes removing the finished traybake much easier.
Cut with a sharp knife
A sharp knife will give you cleaner squares.
Store properly
Keep the squares in an airtight container in a cool place or in the refrigerator if your kitchen is warm.
❤️ Serving Suggestions
Chocolate Cornflake Traybake is delicious on its own, but you can also serve it with:
- A cup of tea
- Coffee
- Hot chocolate
- Vanilla ice cream
- Fresh berries
- Whipped cream
- A drizzle of melted chocolate
For a simple dessert plate, place two squares beside a scoop of vanilla ice cream and drizzle lightly with chocolate sauce.
❄️ Storage
Store the finished squares in an airtight container.
They can generally be kept for several days, although the cornflakes will gradually become less crisp over time.
For the best texture, enjoy them while they are fresh.
If storing in the refrigerator, allow the squares to sit at room temperature for a few minutes before serving so the chocolate isn’t too hard.
🍽️ Nutrition
The calorie estimate will depend on the exact chocolate, butter, syrup, cereal, and optional ingredients used.
The original recipe is approximately 150 calories per square when divided into 16 pieces, but this should be treated as an estimate rather than an exact nutritional value.
❤️ Conclusion
Chocolate Cornflake Traybake is proof that the simplest recipes can sometimes create the biggest memories.
With just a handful of everyday ingredients, you can make something that is rich, crunchy, sweet, chocolatey, and incredibly comforting.
There is no complicated baking technique, no fancy equipment, and no long preparation time. Just melt, mix, press, chill, slice, and enjoy.
Whether you’re making it for your children, preparing a nostalgic treat for yourself, taking it to a family gathering, or creating homemade gifts, this old-fashioned chocolate crunch is a recipe worth keeping.
One bite brings together smooth chocolate, buttery sweetness, golden syrup, and crispy cornflakes—and suddenly a simple afternoon snack feels like a little trip back in time.
So make a batch, cut it into generous squares, put the kettle on, and enjoy this wonderfully nostalgic homemade treat. 🍫🌽❤️