
| ## Introduction: A Cake That Turns Heads |
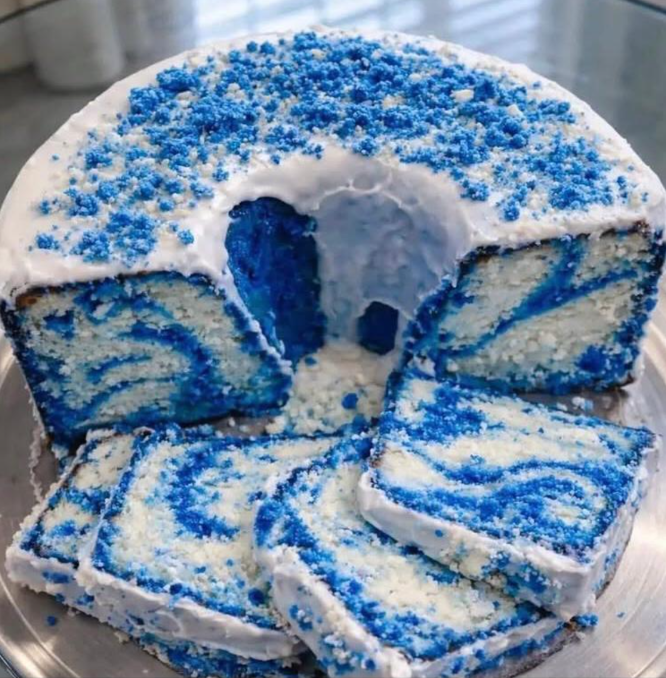
| This Blue Velvet Marble Cake isn’t just dessert—it’s a showstopper. The moment you slice into it, those dramatic swirls of vibrant blue and snowy white steal the spotlight. It’s the kind of cake that makes people pause mid-conversation and say, “Wow, did you really make this?” And the best part? It tastes just as incredible as it looks. Moist, tender, lightly cocoa-kissed, and topped with a cloud of creamy vanilla frosting, this cake is pure joy baked into every bite. |
| ## Who This Recipe Is For |
| This recipe is for the home baker who wants something a little extra without diving into complicated pastry techniques. It’s perfect for birthdays, baby showers, themed parties, or anytime you want to impress without stress. Whether you’re a confident baker or still finding your rhythm in the kitchen, this cake meets you where you are and delivers bakery-worthy results. |
| ## Why You’ll Love This Blue Velvet Marble Cake |
| Let’s be honest—we eat with our eyes first. This cake delivers bold color, dramatic presentation, and familiar comfort flavors all in one. It’s softer than a classic vanilla cake, richer than plain marble cake, and far more memorable. Plus, the marble effect means every slice is unique—just like a fingerprint, but tastier. |
| ## Flavor Profile & Texture Breakdown |
| The flavor sits somewhere between vanilla and light chocolate, thanks to a hint of cocoa powder. The crumb is moist and tender, almost plush, while the frosting adds a creamy sweetness that balances everything beautifully. Think classic velvet cake vibes with a modern, playful twist. |
| ## Ingredients Overview |
| ### Dry Ingredients |
| – All-purpose flour
- Granulated sugar
- Unsweetened cocoa powder
- Baking powder
- Baking soda
- Salt |
| ### Wet Ingredients |
| – Unsalted butter (softened)
- Eggs (room temperature)
- Buttermilk
- Vanilla extract
- White vinegar
- Blue gel food coloring |
| ### Frosting Ingredients |
| – Unsalted butter
- Powdered sugar
- Heavy cream or milk
- Vanilla extract
- Pinch of salt |
| ## Kitchen Equipment You’ll Need |
| – Stand mixer or hand mixer
- Mixing bowls (large and medium)
- Measuring cups and spoons
- Rubber spatula
- 8-inch or 9-inch round cake pan or loaf pan
- Parchment paper
- Cooling rack
- Offset spatula (for frosting) |
| ## Step-by-Step Directions |
| ### Preparing the Batter |
| Start by creaming the butter and sugar until light and fluffy—this step builds the foundation for a soft crumb. Add the eggs one at a time, followed by vanilla extract. In a separate bowl, whisk together dry ingredients. Alternate adding dry ingredients and buttermilk into the butter mixture, mixing gently to avoid overworking the batter. |
| ### Creating the Marble Effect |
| Divide the batter evenly into two bowls. Leave one plain and add cocoa powder and blue food coloring to the other. Swirl both batters together in the pan using a knife or skewer. Don’t overdo it—less swirling equals more dramatic contrast. |
| ### Baking the Cake |
| Bake in a preheated oven at 350°F (175°C) until a toothpick inserted comes out clean. Let the cake cool completely before frosting—patience here pays off big time. |
| ### Making the Vanilla Frosting |
| Beat butter until creamy, then gradually add powdered sugar. Stream in cream and vanilla extract until the frosting is light, fluffy, and spreadable. |
| ## Pro Tips for Bakery-Style Results |
| – Use gel food coloring for vibrant color without thinning the batter.
- Room temperature ingredients blend more smoothly.
- Chill the cake slightly before slicing for cleaner cuts. |
| ## Recipe Variations & Swaps |
| ### Color Variations |
| Swap blue for red, purple, or green depending on your theme. This recipe is a blank canvas. |
| ### Flavor Variations |
| Add almond extract for a nutty twist or orange zest for brightness. |
| ### Dietary Adjustments |
| Use plant-based butter and milk for a dairy-free version. A gluten-free 1:1 flour also works well here. |
| ## Serving Suggestions & Pairings |
| Serve with a cup of hot coffee, vanilla latte, or even a glass of cold milk. For parties, pair with fresh berries or vanilla ice cream. |
| ## How to Store & Freeze Leftovers |
| Store leftovers in an airtight container at room temperature for 2 days or refrigerate for up to 5 days. Freeze unfrosted slices for up to 2 months—wrap tightly for best results. |
| ## Common Mistakes to Avoid |
| – Overmixing the batter
- Using liquid food coloring
- Frosting a warm cake |
| ## Conclusion |
| This Blue Velvet Marble Cake is proof that baking can be both fun and unforgettable. It’s bold, beautiful, and surprisingly easy to make. Whether you’re baking for loved ones or just treating yourself, this cake delivers joy slice after slice. If you loved this recipe, share it with friends and subscribe to the blog for more creative, confidence-boosting bakes. |
| ## FAQs |
| 1. Can I make this cake ahead of time?
Yes! Bake the cake a day ahead and frost before serving. |
| 2. Can I use liquid food coloring?
Gel is recommended, but liquid works with slightly less vibrant color. |
| 3. What pan works best?
Round pans, loaf pans, or even bundt pans all work well. |
| 4. Can I reduce the sugar?
You can reduce sugar by 10–15% without affecting texture too much. |
| 5. Is this kid-friendly?
Absolutely—kids love the color and mild flavor. |