

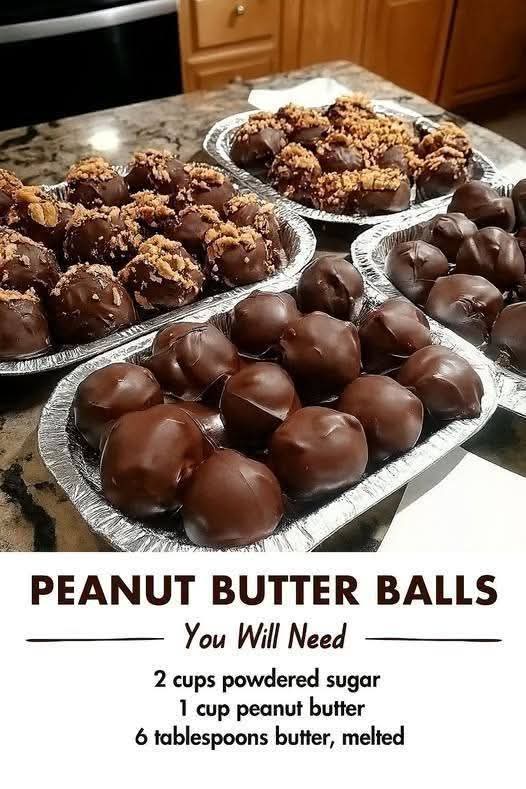
🍫🥜 No-Bake Chocolate Peanut Butter Balls
Introduction
Few holiday treats are as simple, nostalgic, and crowd-pleasing as No-Bake Chocolate Peanut Butter Balls. With a creamy peanut butter center covered in a smooth layer of chocolate, these little treats bring together two flavors that have been loved for generations.
The best part? There is no oven required! Everything comes together with a handful of simple ingredients, making this recipe perfect for busy holiday seasons, cookie exchanges, dessert trays, parties, and homemade edible gifts.
These peanut butter balls are also wonderfully convenient for making in large batches. You can prepare them ahead of time, chill them until firm, dip them in chocolate, and store them in the refrigerator or freezer until you’re ready to serve. Arrange them in a festive tin or gift box, and you have a homemade treat that looks beautiful without requiring complicated decorating skills.
The combination of sweet powdered sugar, rich peanut butter, buttery goodness, vanilla, and chocolate creates a bite that is creamy, slightly crumbly, rich, and completely irresistible.
🥜 Ingredients
For the Peanut Butter Filling
- 2 cups powdered sugar
- 1 cup creamy peanut butter
- 6 tablespoons unsalted butter, melted
- 1 teaspoon vanilla extract
For the Chocolate Coating
- Dipping chocolate of your choice, approximately 12–16 ounces depending on how thick you want the coating
- Optional: 1 teaspoon shortening or coconut oil, if needed to make the chocolate smoother for dipping
Optional Decorations
For a festive holiday appearance, you can also use:
- Holiday sprinkles
- Crushed peanuts
- Mini chocolate chips
- White chocolate drizzle
- Milk chocolate drizzle
- Dark chocolate drizzle
- Crushed pretzels
- Flaky sea salt
- Colored sanding sugar
🍫 Equipment
You don’t need much equipment for this recipe.
- Large mixing bowl
- Measuring cups and spoons
- Wooden spoon or sturdy spatula
- Small cookie scoop
- Baking sheet
- Parchment paper or wax paper
- Microwave-safe bowl or double boiler
- Fork or dipping tool
- Refrigerator
👩🍳 Instructions
Step 1: Prepare the Peanut Butter Mixture
Begin by placing the powdered sugar in a large mixing bowl.
Add the creamy peanut butter, melted butter, and vanilla extract.
Using a sturdy spatula or wooden spoon, begin mixing everything together. At first, the mixture may appear dry and crumbly. Continue stirring until the ingredients come together into a thick, soft dough.
The finished mixture should be firm enough to shape with your hands but soft enough that it doesn’t crumble apart.
Texture Tip
If your mixture seems too dry, add a very small amount of additional melted butter or peanut butter.
If it seems too soft or sticky, gradually add a little more powdered sugar.
Avoid adding too much at once because you want the filling to remain creamy rather than becoming hard and dry.
🥜 Step 2: Shape the Peanut Butter Balls
Line a baking sheet with parchment paper or wax paper.
Using a small cookie scoop or approximately 1 tablespoon of the mixture at a time, portion out the peanut butter filling.
Roll each portion between your palms until you have a smooth ball.
Try to keep the balls approximately the same size so they look uniform and chill evenly.
Place each ball onto the prepared baking sheet.
Continue until all the peanut butter mixture has been used.
You should have approximately 30–40 peanut butter balls, depending on their size.
❄️ Step 3: Chill the Filling
Place the baking sheet in the refrigerator.
Chill the peanut butter balls for approximately 30–60 minutes, or until they become firm.
This step is important because chilled peanut butter balls are much easier to dip into melted chocolate.
If you’re preparing them ahead of time, you can also chill them longer.
🍫 Step 4: Melt the Chocolate
Place your dipping chocolate in a microwave-safe bowl.
Heat it in short intervals, stirring well between each interval, until completely melted and smooth.
Alternatively, melt the chocolate gently using a double boiler.
Be careful not to overheat the chocolate.
If the chocolate is extremely thick, a small amount of shortening or coconut oil can help create a smoother dipping consistency.
🍫 Step 5: Dip the Peanut Butter Balls
Remove the chilled peanut butter balls from the refrigerator.
Using a fork or dipping tool, carefully place one ball into the melted chocolate.
Roll it gently until it is completely coated.
Lift the ball out of the chocolate and allow any excess chocolate to drip back into the bowl.
Place the chocolate-covered ball back onto the parchment-lined baking sheet.
Repeat with the remaining peanut butter balls.
✨ Step 6: Decorate
If you’re adding sprinkles, crushed peanuts, or another topping, add them before the chocolate sets.
For a more elegant holiday appearance, allow the chocolate coating to firm up and then drizzle the finished balls with melted white chocolate or another type of chocolate.
A tiny pinch of flaky sea salt can also provide a delicious contrast to the sweet peanut butter and chocolate.
❄️ Step 7: Let Them Set
Place the finished peanut butter balls in the refrigerator for approximately 20–30 minutes, or until the chocolate coating is completely firm.
Once set, transfer them to an airtight container.
For the best texture, allow them to sit at room temperature for a few minutes before serving.
⏱️ Preparation and Storage
Prep Time: 25 minutes
Chilling Time: 45–60 minutes
Chocolate Setting Time: 20–30 minutes
Total Time: About 1½–2 hours
Yield: Approximately 30–40 balls
Store the finished peanut butter balls in an airtight container in the refrigerator for up to about 1–2 weeks.
They can also be frozen in a well-sealed freezer container for longer storage. Separate layers with parchment paper to prevent them from sticking together.
Allow frozen treats to thaw in the refrigerator before serving.
🎄 A Little History
Chocolate and peanut butter have become one of the most beloved flavor combinations in American-style desserts. Peanut butter became increasingly popular in household cooking during the late 19th and early 20th centuries, while chocolate became an increasingly common ingredient in home baking and confectionery.
No-bake sweets became especially popular because they were inexpensive, practical, and didn’t require an oven. Recipes using powdered sugar, butter, peanut butter, and chocolate could easily be prepared in home kitchens and made in large quantities.
Over time, variations of peanut butter balls became popular around the holidays. Families could prepare a large batch, keep them chilled, and share them with friends and neighbors.
That’s part of what makes these treats so special today: they’re simple enough for beginners but nostalgic enough to remind people of homemade holiday desserts.
🎁 Perfect for Holiday Gifts
These treats are especially wonderful for homemade gifts.
Once the chocolate has completely hardened, arrange several peanut butter balls inside a small holiday box or decorative tin.
You can separate the layers with parchment or mini cupcake liners.
Add a ribbon and a handwritten label, and you have an inexpensive homemade gift that looks thoughtful and festive.
They are perfect for:
- Christmas cookie exchanges
- Holiday parties
- School events
- Office treats
- Family gatherings
- Dessert tables
- Homemade food gifts
- Holiday gift baskets
- Neighbor gifts
- Potluck celebrations
❤️ Why Peanut Butter Lovers Will Love Them
If you’re a serious peanut butter lover, this recipe is hard to resist.
The center is rich and creamy with a sweet peanut butter flavor, while the chocolate shell adds a smooth, slightly crisp exterior.
Every bite gives you that classic chocolate-and-peanut-butter combination without the need to turn on your oven.
They’re also small enough that guests can grab one—or two—without committing to a large slice of cake or pie.
🍫 Flavor Variations
Dark Chocolate Peanut Butter Balls
Use dark chocolate for the coating to create a deeper, less-sweet chocolate flavor.
Milk Chocolate Version
Milk chocolate creates a sweeter, creamier combination that is especially popular with children.
White Chocolate Peanut Butter Balls
Dip the peanut butter centers in white chocolate for a beautiful contrast.
Add holiday sprinkles for a festive finish.
Crunchy Peanut Butter
Replace creamy peanut butter with crunchy peanut butter if you enjoy pieces of peanuts throughout the filling.
Pretzel Version
Add finely crushed pretzels to the peanut butter mixture or sprinkle crushed pretzels over the chocolate before it sets.
The salty crunch pairs beautifully with the sweet filling.
Sea Salt Chocolate Version
After dipping, sprinkle each ball with a tiny amount of flaky sea salt.
The salt enhances both the chocolate and peanut butter flavors.
⭐ Helpful Tips for Perfect Peanut Butter Balls
Use regular peanut butter
For the most reliable texture, traditional commercially prepared peanut butter works well because its consistency is stable.
Don’t skip chilling
Chilling makes the balls firmer and easier to dip.
Keep the chocolate warm
If the chocolate begins becoming too thick while you’re working, gently warm it again.
Don’t make the balls too large
Smaller balls are easier to dip and create a better chocolate-to-peanut-butter balance.
Work in batches
Keep most of the peanut butter balls refrigerated while dipping a smaller portion. This helps keep them firm.
Let the chocolate set completely
Don’t stack them immediately after dipping. Give the chocolate enough time to harden first.
🧁 How to Make a Large Batch
These are perfect for holiday baking because the recipe scales easily.
For approximately twice as many treats, simply double the ingredients.
For a large holiday gathering, prepare several batches separately rather than making one extremely large bowl of filling. This makes the mixture easier to combine and keeps the proportions accurate.
You can even prepare the peanut butter balls one day and dip them in chocolate the next day.
🎄 Presentation Ideas
For a beautiful holiday dessert table, arrange the finished peanut butter balls on a large serving platter.
Mix different chocolate coatings together for variety:
- Dark chocolate
- Milk chocolate
- White chocolate
Decorate each variety differently.
For example, dark chocolate balls can receive crushed peanuts, milk chocolate balls can receive holiday sprinkles, and white chocolate balls can receive a drizzle of dark chocolate.
The result looks like an assortment of homemade gourmet candies.
💕 The Perfect Holiday Treat
There is something wonderfully comforting about a dessert that doesn’t require complicated ingredients or hours in the kitchen.
These No-Bake Chocolate Peanut Butter Balls are simple, rich, festive, and incredibly easy to make. The creamy peanut butter center and chocolate coating create the kind of classic combination that appeals to both children and adults.
They’re especially useful during the holidays when the oven is already busy with cookies, pies, casseroles, and other dishes.
Best of all, you can make them ahead of time, refrigerate them, and have a beautiful homemade dessert ready whenever guests arrive.
🥜🍫 Final Thoughts
No-Bake Chocolate Peanut Butter Balls prove that an impressive holiday dessert doesn’t have to be complicated.
With just powdered sugar, peanut butter, butter, vanilla, and chocolate, you can create dozens of bite-sized treats that are perfect for sharing.
Whether you’re making them for Christmas, a cookie exchange, a family celebration, a party, or simply because you love chocolate and peanut butter, these little candies are guaranteed to disappear quickly.
Make a batch, chill them, dip them in plenty of chocolate, decorate them for the season, and watch everyone reach for one more.
Classic, easy, homemade, and completely no-bake—exactly the kind of holiday treat worth keeping in your recipe collection. ❤️🍫🥜