

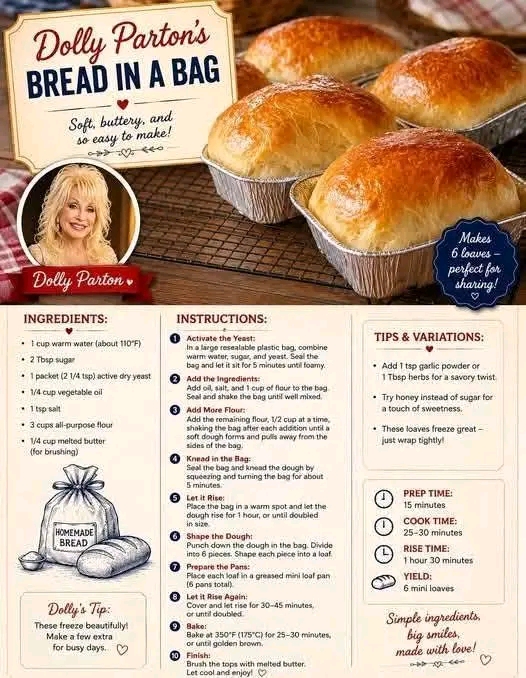
🍞✨ Dolly Parton’s “Bread in a Bag” ✨🍞
Easy Homemade Bread Without the Big Mess
There is something truly special about homemade bread. The smell of yeast, the golden crust, the soft center, and that first warm slice spread with butter can make an ordinary day feel wonderfully cozy.
But let’s be honest—making bread the traditional way can sometimes mean flour everywhere, sticky dough on your hands, several bowls to wash, and a kitchen that looks like a small flour storm passed through it!
That is why Bread in a Bag is such a fun idea. Most of the mixing and early kneading happens right inside a sturdy food-safe resealable bag. You simply add your ingredients, seal the bag, squeeze and knead the dough, then shape it and finish it in a loaf pan.
This style of bread has been used for years as a simple, hands-on way to introduce people to yeast baking. University extension recipes use essentially the same concept, with warm water, yeast, flour, sugar, salt, and oil mixed in a large resealable bag.
The result is a beautiful homemade loaf with a lightly golden crust and a soft, tender interior—perfect for toast, sandwiches, breakfast, or simply eating warm with butter. ❤️
📝 Recipe at a Glance
Recipe: Bread in a Bag
Yield: 1 large loaf
Prep time: 20–30 minutes
Rising time: 45–60 minutes
Baking time: 30–35 minutes
Difficulty: Easy to moderate
Best for: Beginners, families, weekend baking, and anyone who hates a messy kitchen
🛒 Ingredients
For the Bread
- 3 cups all-purpose flour, divided, plus extra if needed
- 1 packet rapid-rise or instant yeast, about 2¼ teaspoons
- 2 tablespoons granulated sugar
- 1 teaspoon salt
- 1 cup warm water, approximately 120–130°F / 49–54°C
- 3 tablespoons vegetable oil or melted butter
- 1 tablespoon melted butter, optional, for brushing the crust
Optional Additions
For a slightly richer loaf, you can add:
- 1 tablespoon honey
- 1 tablespoon powdered milk
- 1 tablespoon melted butter
- 1 teaspoon garlic powder for savory bread
- 1 tablespoon dried herbs
- 2 tablespoons sesame seeds
- 2 tablespoons sunflower seeds
- 2 tablespoons rolled oats
Important: Use a sturdy, food-safe freezer bag rather than a thin storage bag. Do not put the plastic bag into the oven—the bag is only for mixing and kneading.
🥣 Equipment
- 1 large gallon-size resealable freezer bag
- 1 standard 9 × 5-inch loaf pan
- Measuring cups and spoons
- Wooden spoon, optional
- Clean kitchen towel
- Cooling rack
- Pastry brush, optional
- Instant-read thermometer, optional
👩🍳 Instructions
Step 1: Prepare Your Ingredients
Measure everything before you begin.
The most important ingredient to pay attention to is the water. It should be warm, not boiling hot. Water that is too hot can damage the yeast and prevent the bread from rising properly.
Aim for approximately 120–130°F (49–54°C).
Step 2: Start the Dough Inside the Bag
Place the following into your large freezer bag:
- 1 cup of the flour
- Yeast
- Sugar
- Salt
Seal the bag, leaving a little room for the ingredients to move.
Gently shake the bag and squeeze it with your hands until the dry ingredients are evenly distributed.
This is where the magic begins—you are mixing your bread dough without needing a mixing bowl.
Step 3: Add the Warm Water and Oil
Open the bag carefully.
Pour in:
- 1 cup warm water
- 3 tablespoons vegetable oil or melted butter
Push most of the air out of the bag and seal it securely.
Now gently squeeze, press, and massage the outside of the bag.
Keep working the mixture until the liquid begins combining with the flour and yeast.
At first, it will look wet and uneven.
Don’t worry!
Bread dough often looks messy before it starts coming together.
✋ Step 4: Add the Remaining Flour
Gradually add the remaining flour.
Do not dump all of it in at once.
Add a little, seal the bag, and squeeze and knead.
Then add a little more.
Continue until the dough becomes soft and cohesive and begins pulling away from the sides of the bag.
You may not need every last bit of flour, depending on humidity, flour type, and measuring differences.
The finished dough should feel soft and slightly tacky, not extremely wet or rock-hard.
🤲 Step 5: Knead the Dough
Continue kneading the dough through the bag for several minutes.
Press it.
Fold it.
Turn it.
Squeeze it.
Repeat.
The goal is to develop gluten, which gives the bread its structure and chewy texture.
Once the dough feels smooth and elastic, carefully open the bag.
Transfer the dough onto a lightly floured work surface.
Knead for another 3–5 minutes, adding only a small amount of flour if necessary.
The dough should become smooth and springy.
Many established Bread in a Bag recipes use a short period of traditional kneading after the dough has been mixed in the bag.
⏰ Step 6: Let the Dough Rest
Place the dough on a lightly floured surface or in a lightly oiled bowl.
Cover it with a clean kitchen towel.
Let it rest for approximately 10 minutes.
This short rest allows the dough to relax, making it easier to shape.
🍞 Step 7: Shape the Loaf
Lightly grease your loaf pan.
Flatten the dough gently into a rough rectangle.
Roll it up tightly from one short end to the other.
Pinch the seam closed.
Place the dough seam-side down into the prepared loaf pan.
Gently press it into the pan so it sits evenly.
🌡️ Step 8: Let the Bread Rise
Cover the loaf loosely with a clean kitchen towel.
Place it somewhere warm and draft-free.
Allow it to rise for approximately 45–60 minutes, or until the dough has noticeably increased in size and is approaching the top of the pan.
Don’t rely only on the clock.
The dough’s appearance is more important than an exact rising time.
A cool kitchen may require longer.
A warm kitchen may require less.
🔥 Step 9: Preheat the Oven
While the bread is rising, preheat your oven to:
350°F / 175°C
Some Bread in a Bag versions use 375°F, while others use 350°F, so baking temperature varies between versions.
For this loaf, 350°F gives you a gentle bake and a nicely browned crust.
🧈 Step 10: Brush the Top
Once the dough has risen, gently brush the top with melted butter.
This is optional, but it gives the finished loaf a beautiful golden appearance and a soft, buttery crust.
For a rustic loaf, you can also sprinkle the top with:
- Sesame seeds
- Rolled oats
- Sunflower seeds
- Dried herbs
- A tiny pinch of coarse salt
🔥 Step 11: Bake
Place the loaf in the preheated oven.
Bake for approximately 30–35 minutes, or until:
- The top is golden brown.
- The loaf sounds hollow when tapped.
- The bread has pulled slightly away from the sides of the pan.
- The center reaches approximately 190–200°F if checked with an instant-read thermometer.
Ovens vary, so begin checking toward the lower end of the baking range.
❄️ Step 12: Cool Before Slicing
Remove the bread from the oven.
Let it sit in the pan for about 5–10 minutes.
Then carefully remove it from the pan and transfer it to a cooling rack.
Try not to slice it immediately.
I know it is difficult!
The smell will be incredible, and you will want that first warm slice right away.
But allowing the loaf to cool helps the crumb finish setting and makes slicing easier.
🔪 Step 13: Slice and Serve
Use a serrated bread knife to cut the loaf into slices.
Serve warm with:
🧈 Soft butter
🍓 Strawberry jam
🍯 Honey
🥜 Peanut butter
🍳 Eggs
🧀 Cheese
🥑 Avocado
Or simply tear off a piece and enjoy it fresh from the oven.
Sometimes simple is best!
🌾 The History Behind “Bread in a Bag”
Bread has been made for thousands of years, but Bread in a Bag is a much more modern teaching and convenience technique.
The concept became popular because it allows beginners—and especially children—to experience yeast bread-making without immediately covering the kitchen in flour.
The method is surprisingly practical: dry ingredients go into a large resealable bag, warm liquid is added, and the dough is mixed and kneaded by squeezing and working the outside of the bag.
University extension programs have published Bread in a Bag recipes using this approach, and the Home Baking Association also describes it as a way to make bread without a mixer or even a traditional mixing bowl.
So while the recipe is popularly circulated online under names such as “Dolly Parton’s Bread in a Bag,” the bread-in-a-bag technique itself is not uniquely associated with Dolly Parton. The name is best understood as a popular recipe title rather than a documented original Dolly Parton recipe.
🧪 The Formation of the Bread
There is a little food science happening inside that simple bag!
Yeast
Yeast is the living microorganism responsible for fermentation.
When provided with moisture and food, it produces carbon dioxide gas.
Those tiny gas bubbles become trapped inside the developing gluten network.
That is what makes the dough expand.
Gluten
When flour becomes hydrated and the dough is kneaded, gluten-forming proteins begin creating an elastic network.
That network gives bread its structure.
It is why kneading changes the dough from a rough, sticky mixture into something smooth and stretchy.
The Rise
As yeast produces carbon dioxide, the dough expands.
A properly risen loaf should feel lighter and look noticeably larger.
Baking
When the loaf enters the hot oven, the gases expand rapidly.
The yeast eventually becomes inactive from the heat.
The dough sets, the crust develops, and the wonderful smell of freshly baked bread fills the kitchen.
💡 Helpful Tips for Perfect Bread
❤️ Don’t kill the yeast
Your water should be warm, not scorching hot.
❤️ Don’t add too much flour
A little stickiness is normal.
Too much flour can make the finished bread heavy and dry.
❤️ Give the dough enough time
If your kitchen is cool, the dough may need extra time to rise.
❤️ Don’t rush the cooling
Fresh bread continues to settle as it cools.
❤️ Use a strong bag
A heavy-duty freezer bag is much less likely to split while you’re kneading.
❤️ Keep the bag outside the oven
The bag is for mixing and kneading only.
🌿 Delicious Variations
🧄 Garlic Herb Bread
Add:
- 1 teaspoon garlic powder
- 1 teaspoon dried Italian herbs
- 2 tablespoons grated Parmesan
Brush the finished loaf with melted garlic butter.
🍯 Honey Butter Bread
Replace the sugar with:
- 2 tablespoons honey
Add an extra tablespoon of melted butter to the dough.
This creates a slightly richer, gently sweet loaf.
🌻 Seeded Bread
Add:
- 1 tablespoon sunflower seeds
- 1 tablespoon sesame seeds
- 1 tablespoon pumpkin seeds
Sprinkle additional seeds on top before baking.
🧀 Cheesy Bread
Add approximately:
- ½ cup shredded cheddar
- ¼ cup grated Parmesan
Mix the cheese into the dough near the end of kneading.
🥪 Ways to Enjoy This Homemade Bread
This loaf is incredibly versatile.
Use it for:
Breakfast
Toast it and serve with butter, jam, eggs, or honey.
Lunch
Make classic sandwiches with cheese, chicken, turkey, vegetables, or tuna.
Dinner
Serve thick slices alongside soup, stew, pasta, or roasted vegetables.
Snack
Toast a slice and spread it with peanut butter or butter and cinnamon sugar.
French Toast
Day-old homemade bread makes an excellent base for French toast.
Garlic Toast
Slice the bread, brush with garlic butter, and toast until golden.
❤️ Why Bread Lovers Adore This Recipe
Bread lovers know that homemade bread isn’t just about the ingredients.
It’s about the experience.
It’s the smell filling the house.
It’s the sound of the crust cracking as the loaf cools.
It’s butter melting into a warm slice.
It’s knowing that flour, yeast, water, salt, and a little patience transformed into something delicious.
And the best part of this method?
You don’t need a fancy mixer.
You don’t need a complicated bread machine.
You don’t need a kitchen full of equipment.
You can simply grab a sturdy bag and get your hands involved.
🏡 A Perfect Family Baking Activity
Bread in a Bag can also be a fun way to introduce beginners to baking.
Children can help measure ingredients, shake the bag, and gently knead the dough under supervision.
It turns bread-making into something hands-on and approachable.
And when the loaf finally comes out of the oven, everyone gets to share the reward.
🧈 Serving Suggestion
For the ultimate cozy serving:
Slice the warm loaf thickly.
Spread generously with softened butter.
Drizzle with a little honey.
Add a tiny sprinkle of cinnamon if you like sweet bread.
Then enjoy it with coffee, tea, hot chocolate, or a glass of cold milk.
Absolutely delicious!
🥖 Storage
Once completely cool, keep the bread in an airtight container or bread bag at room temperature.
For the best texture, enjoy it within a few days.
You can also slice the loaf and freeze the slices in a freezer-safe bag.
That way, you can take out individual slices whenever you want homemade bread.
✨ Final Thoughts
There is something wonderfully old-fashioned about making bread at home.
You start with simple ingredients.
You mix them together.
You knead.
You wait.
You watch the dough rise.
Then suddenly, your kitchen smells like a bakery.
This Bread in a Bag method makes that experience easier, less intimidating, and much less messy.
Whether you’re an experienced baker or someone making homemade bread for the very first time, this recipe is a beautiful reminder that you don’t need complicated equipment to create something comforting and delicious.
So grab a sturdy bag, warm up the oven, and get ready for a loaf with a soft center, golden crust, and plenty of homemade love. 🍞❤️
❤️ For the Bread Lovers
If you love homemade bread, save this recipe!
There is nothing quite like pulling a warm loaf from the oven, slicing it open, and watching a little cloud of steam escape.
Homemade bread + butter + a quiet moment = pure comfort. 🧈🍞✨