

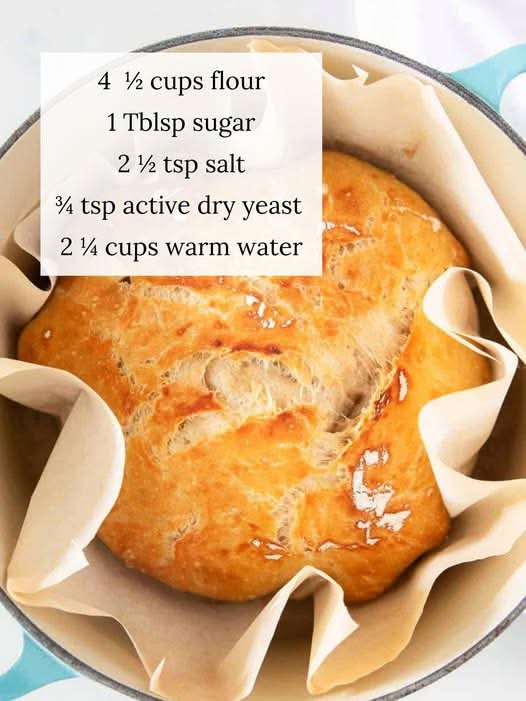
🥖 Dutch Oven No-Knead Bread
Bakery-Quality Bread with Just 4 Simple Ingredients!
There is something truly magical about pulling a freshly baked loaf of bread from the oven. 🥖✨ The crispy, golden crust, the soft and airy center, and that incredible homemade aroma can make any kitchen feel like a bakery.
The best part? This Dutch Oven No-Knead Bread is unbelievably simple! With just 4 basic ingredients and about 5 minutes of hands-on preparation, you can create a beautiful artisan-style loaf with a crunchy crust and a tender, chewy interior.
No mixer. No complicated kneading. No special bread-making skills required!
🛒 Ingredients
You only need four simple ingredients:
- 3 cups all-purpose flour
- 1½ teaspoons salt
- ½ teaspoon instant yeast
- 1½ cups warm water
That’s it! 🙌🥖
Optional additions
If you want to experiment with flavors, you can also add:
- Fresh or dried herbs
- Garlic powder
- Shredded cheese
- Rosemary
- Sesame seeds
- Everything bagel seasoning
- Cracked black pepper
👩🍳 Instructions
Step 1: Combine the dry ingredients
In a large mixing bowl, add:
- Flour
- Salt
- Instant yeast
Stir everything together until evenly combined.
Step 2: Add the water
Pour the warm water into the bowl.
Using a wooden spoon or spatula, stir until all the flour is incorporated.
The dough will look rough, sticky, and shaggy—and that’s exactly how it should look!
Do not knead the dough.
Step 3: Let the dough rest
Cover the bowl with plastic wrap, a lid, or a clean kitchen towel.
Allow the dough to rest at room temperature for approximately 8 to 12 hours.
During this time, something wonderful happens. The yeast slowly works through the dough, creating tiny bubbles and developing delicious flavor.
For even deeper flavor, you can allow the dough to rest longer, up to about 18 hours, depending on your kitchen temperature.
🥣 The No-Knead Method
Traditional bread recipes often require kneading to develop gluten.
But the no-knead method works differently.
Instead of using physical kneading, time does the work for you.
As the dough rests:
✨ The flour absorbs the water.
✨ Gluten develops naturally.
✨ The yeast creates air bubbles.
✨ The dough becomes lighter and more elastic.
✨ Flavor develops slowly.
This is why such a simple recipe can produce such impressive results!
🔥 Preparing the Dutch Oven
About 30 minutes before baking, place your Dutch oven with its lid inside the oven.
Preheat the oven to 450°F (230°C).
Preheating the Dutch oven is one of the biggest secrets to creating that amazing bakery-style crust.
The extremely hot pot gives the dough an immediate burst of heat when it begins baking.
🍞 Step 4: Shape the dough
Lightly flour your work surface.
Gently scrape the dough out of the bowl.
Using floured hands, fold the dough over itself a few times and shape it into a rough round loaf.
You don’t need to make it perfect!
Place the dough on a piece of parchment paper and allow it to rest while the Dutch oven finishes heating.
🥖 Step 5: Bake with the lid on
Carefully remove the hot Dutch oven from the oven.
Using the parchment paper, gently lower the dough into the pot.
Place the lid on top.
Bake for approximately 30 minutes.
🔥 Step 6: Bake with the lid off
After 30 minutes, carefully remove the lid.
Continue baking for another 10–15 minutes, or until the bread develops a deep golden-brown crust.
This final uncovered baking time creates that beautiful crispy exterior everyone loves!
❄️ Step 7: Cool before slicing
Remove the bread from the Dutch oven and place it on a wire rack.
Allow it to cool for at least 30 minutes before slicing.
It can be tempting to cut into the loaf immediately, but cooling allows the inside to finish setting properly.
Then slice, serve, and enjoy! 😍🥖
🏛️ A Little History of No-Knead Bread
Bread has been one of the world’s oldest and most important foods for thousands of years. Traditional bakers spent generations learning how flour, water, yeast, heat, and time could be transformed into delicious loaves.
The idea behind no-knead bread is based on a simple principle: given enough time, dough can develop structure without intensive kneading.
Modern home baking made this method especially popular because it allows everyday cooks to achieve artisan-style results without expensive equipment or complicated techniques.
The Dutch oven also plays an important role by trapping steam inside the pot during the first stage of baking.
💨 Why the Dutch Oven Works So Well
A Dutch oven acts almost like a tiny professional bread oven.
When the dough begins baking inside the covered pot:
- Moisture turns into steam.
- Steam surrounds the dough.
- The crust stays soft during the early baking stage.
- The bread expands beautifully.
- The dough develops a lighter interior.
Once the lid is removed, the moisture escapes and the crust becomes golden, crisp, and wonderfully crunchy. ✨
🥖 The Perfect Bread Formation
A great no-knead Dutch oven loaf should have:
🌟 A crispy crust
Golden, crunchy, and full of texture.
☁️ An airy interior
Soft with beautiful little holes throughout the bread.
🤎 A chewy texture
Tender but satisfying with every bite.
🥣 A rich homemade flavor
Simple ingredients become something extraordinary through time and heat.
❤️ Why Bread Lovers Will Love This Recipe
This recipe is perfect for anyone who loves fresh homemade bread but doesn’t want to spend hours kneading dough.
Bread lovers will enjoy:
🥖 The crispy artisan-style crust
☁️ The soft and fluffy inside
⏰ The incredibly easy preparation
🛒 The simple everyday ingredients
🏠 The amazing smell of fresh bread filling the kitchen
It’s also a wonderful recipe for beginner bakers!
⭐ Tips for the Best Results
- Measure your flour carefully.
- Don’t add too much extra flour when shaping the dough.
- Make sure your Dutch oven is fully preheated.
- Keep the lid on during the first part of baking.
- Allow the bread to cool before slicing.
- Store leftover bread in a bread bag or loosely wrapped at room temperature.
For a softer crust the next day, warm the bread briefly in the oven before serving.
🍽️ Delicious Ways to Serve It
This beautiful homemade bread is delicious with:
- Butter 🧈
- Honey 🍯
- Olive oil and herbs
- Soup
- Pasta
- Sandwiches
- Cheese
- Jam
- Eggs
Or simply enjoy a warm slice straight from the kitchen!
🏁 Conclusion
This Dutch Oven No-Knead Bread proves that incredible homemade baking doesn’t have to be complicated. With only 4 ingredients, minimal preparation, and a little patience, you can create a loaf that looks and tastes like it came straight from a bakery. 🥖✨
The crispy crust, soft center, and irresistible fresh-bread aroma make this a recipe you’ll want to bake again and again.
Simple ingredients + almost no effort + amazing results = the perfect homemade bread! 😍🍞