

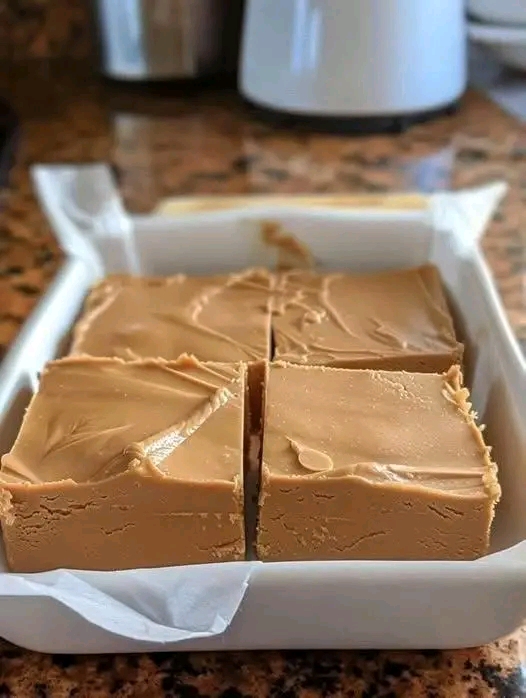
Old-Fashioned Peanut Butter Fudge
Introduction
Old-Fashioned Peanut Butter Fudge is one of those classic homemade sweets that brings back memories of holiday kitchens, family gatherings, bake sales, and handwritten recipe cards. It is rich, creamy, intensely peanut-buttery, and wonderfully sweet, with a smooth texture that practically melts in your mouth.
Unlike modern shortcut fudge recipes that often rely on condensed milk or marshmallows, traditional peanut butter fudge is commonly made by cooking sugar, milk, butter, and peanut butter to the correct temperature and then beating the mixture until it begins to set. That old-fashioned method creates the characteristic dense yet creamy texture that fudge lovers appreciate.
This recipe makes a generous batch and is perfect for Christmas, Thanksgiving, birthdays, parties, homemade gifts, or simply keeping a container of something sweet in the refrigerator.
Nutritional Information
Approximate nutrition per piece, assuming 36 pieces:
- Calories: 145–165 kcal
- Protein: 3–4 g
- Carbohydrates: 18–21 g
- Fat: 7–9 g
- Saturated fat: 2–3 g
- Fiber: 1 g
- Sugar: 16–18 g
- Sodium: 60–100 mg
The exact nutritional values depend on the peanut butter, butter, milk, and portion size used.
Ingredients
Main Ingredients
- 2 cups granulated sugar
- ½ cup whole milk
- ½ cup unsalted butter
- 1 cup creamy peanut butter
- 1 teaspoon pure vanilla extract
- ¼ teaspoon salt
Optional Ingredients
For an even richer fudge, you can add:
- ½ cup chopped roasted peanuts
- ½ cup mini chocolate chips
- ¼ teaspoon cinnamon
- 2 tablespoons heavy cream for extra richness
- A small pinch of flaky sea salt for finishing
For the Pan
- 1 teaspoon butter, for greasing
- Parchment paper, optional
Equipment
You will need:
- Medium-to-large heavy-bottomed saucepan
- Wooden spoon or heat-resistant spatula
- Candy thermometer
- 8 × 8-inch or 9 × 9-inch square pan
- Measuring cups and spoons
- Mixing bowl, optional
- Sharp knife
A candy thermometer is highly recommended because traditional fudge depends heavily on reaching the correct temperature.
Instructions
1. Prepare the Pan
Grease an 8 × 8-inch or 9 × 9-inch square pan lightly with butter.
For easier removal, line the pan with parchment paper, leaving a little extra paper hanging over two sides.
This creates handles that make it easy to lift the finished fudge out of the pan.
Set the prepared pan aside.
2. Measure Everything Before Starting
Traditional fudge requires attention once the sugar mixture begins cooking.
Measure your peanut butter, butter, vanilla, salt, and any optional ingredients before you begin.
This prevents you from having to stop and measure ingredients while the hot sugar mixture is ready to be handled.
3. Combine Sugar and Milk
Place the granulated sugar and whole milk into a heavy-bottomed saucepan.
Stir gently over medium heat until the sugar begins dissolving.
Add the butter.
Continue stirring until the butter melts completely.
4. Bring the Mixture to a Boil
Increase the heat slightly and bring the mixture to a steady boil.
Once it begins boiling, continue cooking while stirring regularly.
Attach your candy thermometer to the side of the saucepan.
The mixture should reach approximately 234–238°F (112–114°C), commonly known as the soft-ball stage.
This temperature is crucial.
If the mixture doesn’t reach a high enough temperature, the fudge may remain too soft.
If it becomes too hot, the finished fudge may become dry, crumbly, or overly hard.
5. Add the Peanut Butter
Once the sugar mixture reaches the appropriate temperature, remove the saucepan from the heat.
Immediately stir in:
- Peanut butter
- Salt
- Vanilla extract
Stir until the peanut butter completely melts into the hot mixture and everything becomes smooth and uniform.
If you’re adding chopped peanuts, wait until this stage to incorporate them.
6. Beat the Fudge
This is one of the most important steps in old-fashioned fudge making.
Allow the mixture to cool slightly for a few minutes.
Then begin beating it vigorously with a wooden spoon or sturdy spatula.
Continue beating for several minutes.
At first, the mixture will look shiny and very fluid.
As you continue beating, it will gradually become:
- Thicker
- Creamier
- Less glossy
- More opaque
When it begins to noticeably thicken and starts holding its shape, it is ready for the pan.
Don’t wait until it becomes completely stiff in the saucepan.
7. Transfer to the Pan
Immediately pour or spoon the thickened fudge into your prepared pan.
Use a spatula to spread it evenly.
Work relatively quickly because the fudge will continue to firm up as it cools.
If desired, sprinkle chopped roasted peanuts over the surface.
For a sweet-and-salty finish, add a very small amount of flaky sea salt.
8. Cool Completely
Leave the fudge at room temperature until it cools and firms.
This may take approximately 2–3 hours.
For a firmer texture, refrigerate it for another hour or two after it has cooled.
Avoid cutting it while it is still warm because it may not hold clean edges.
9. Cut the Fudge
Lift the fudge from the pan using the parchment paper handles.
Place it on a cutting board.
Use a sharp knife to cut it into squares.
For approximately 36 pieces, cut the slab into 6 rows by 6 rows.
For larger pieces, cut into 4 × 4 or 5 × 5 squares.
Traditional Cooking Method
The old-fashioned method relies on controlling the sugar concentration rather than simply melting ingredients together.
The basic process is:
Dissolve → Boil → Reach soft-ball stage → Add peanut butter → Beat → Set → Cut
The sugar and milk are heated until enough water evaporates.
As the water evaporates, the concentration of sugar increases.
When the mixture reaches the soft-ball stage, it has the correct concentration to form the characteristic fudge texture once cooled and beaten.
This is why a candy thermometer can make the recipe much more reliable.
The Formation of Fudge
The texture of traditional fudge is created through a combination of sugar concentration and crystallization.
During cooking, sugar dissolves in the liquid ingredients.
When the mixture reaches the soft-ball stage and then cools, the sugar begins forming tiny crystals.
Beating the fudge encourages the formation of many small crystals rather than a smaller number of large crystals.
Small crystals produce the smooth, creamy texture associated with good fudge.
If the fudge is beaten too little, it may remain too soft or develop an undesirable texture.
If it is beaten excessively or disturbed at the wrong stage, it can become overly firm or grainy.
That delicate balance is part of what makes old-fashioned fudge so special.
History of Peanut Butter Fudge
Fudge became popular in the United States during the late 19th century and was particularly associated with home kitchens, women’s colleges, holiday cooking, and community events.
Peanut butter became increasingly popular in American cooking during the late 19th and early 20th centuries. As peanut butter became a common pantry ingredient, cooks began incorporating it into desserts, including fudge.
Peanut butter fudge eventually became a beloved American confection, especially in family recipe collections.
Many old-fashioned versions use only a handful of ingredients: sugar, milk, butter, peanut butter, and vanilla.
The simplicity is part of its appeal.
Instead of relying on complicated decorations, the recipe focuses on the flavor of roasted peanuts and the creamy texture of properly cooked sugar.
Why Fudge Lovers Love It
Peanut butter fudge has an enormous following because it delivers a powerful combination of textures and flavors.
Peanut Butter Lovers
If you love peanut butter, this recipe puts it front and center.
The peanut butter isn’t simply a background flavor. It is the star of the dessert.
Fudge Lovers
The texture is creamy and dense while still being tender enough to melt in your mouth.
Sweet-and-Salty Lovers
A small amount of salt balances the sweetness and makes the peanut flavor stand out.
Old-Fashioned Dessert Lovers
The traditional cooking technique gives this recipe a nostalgic quality that modern shortcut versions don’t always provide.
Variations
Chocolate Peanut Butter Fudge
Add ½ cup semi-sweet chocolate chips immediately after removing the sugar mixture from the heat.
Stir until completely melted before adding the peanut butter.
This creates a rich chocolate-peanut butter combination.
Peanut Butter and Chocolate Swirl
Prepare the peanut butter fudge as directed.
Separately melt approximately ½ cup chocolate chips.
Pour the peanut butter fudge into the pan.
Drizzle the melted chocolate over the top.
Use a knife to create gentle swirls.
Allow to cool completely before cutting.
Crunchy Peanut Butter Fudge
Replace creamy peanut butter with crunchy peanut butter.
You can also add ½ cup chopped roasted peanuts for extra texture.
Honey Peanut Butter Fudge
Replace a small portion of the sugar with honey.
This produces a slightly different flavor and a softer, more caramel-like sweetness.
Because changing sugar ratios can affect the final texture, this variation is best made in small batches.
Peanut Butter Marshmallow Fudge
For a softer, lighter texture, stir in approximately 1 cup mini marshmallows after removing the mixture from the heat.
Beat until incorporated.
Tips for Perfect Old-Fashioned Peanut Butter Fudge
1. Use a Heavy-Bottomed Pan
A heavy saucepan distributes heat more evenly and reduces the risk of scorching.
2. Don’t Rush the Boiling Stage
Allow the sugar mixture to reach the correct temperature gradually.
3. Use a Candy Thermometer
Temperature is more reliable than simply guessing by appearance.
4. Don’t Scrape Burned Sugar
If sugar sticks or burns to the bottom of the pan, don’t scrape it into your fudge.
5. Use Good Peanut Butter
Choose a peanut butter you enjoy eating on its own because its flavor will dominate the finished fudge.
6. Don’t Overbeat
Beat until the mixture thickens and loses its glossy appearance, then transfer it immediately.
7. Let It Set Completely
Patience is important. Cutting too early can produce messy pieces.
How to Store It
Place the finished fudge in an airtight container.
Separate layers with parchment or wax paper.
Store at room temperature for approximately 1–2 weeks in a cool, dry place.
For a firmer texture, keep it refrigerated.
Refrigerated fudge can generally stay good for approximately 2–3 weeks when properly sealed.
Can You Freeze Peanut Butter Fudge?
Absolutely.
Cut the fudge into individual pieces and wrap them tightly in plastic wrap.
Place the wrapped pieces into a freezer-safe airtight container or bag.
Freeze for approximately 2–3 months for best quality.
When ready to eat, transfer the fudge to the refrigerator and allow it to thaw gradually.
Then bring it toward room temperature before serving for the best creamy texture.
Serving Ideas
Old-fashioned peanut butter fudge is excellent by itself, but you can make it part of a larger dessert spread.
Serve pieces alongside:
- Hot coffee
- Tea
- Hot chocolate
- Vanilla ice cream
- Chocolate ice cream
- Fresh berries
- Whipped cream
- Chocolate brownies
- Homemade cookies
You can also place small pieces of fudge into holiday gift boxes with cookies and other homemade treats.
Perfect for Holidays
Peanut butter fudge is particularly popular during the holiday season.
For Christmas, cut it into small squares and arrange it in a decorative tin.
For Thanksgiving, serve it as part of a dessert platter.
For Valentine’s Day, cut the fudge into small hearts using a cookie cutter while it is still slightly soft.
For birthdays and parties, make smaller bite-sized pieces so guests can enjoy them without committing to a large portion.
Conclusion
Old-Fashioned Peanut Butter Fudge is a timeless homemade treat built around simple ingredients and traditional candy-making technique. The combination of creamy peanut butter, butter, sugar, milk, and vanilla produces a rich confection with an unmistakable roasted peanut flavor and a wonderfully smooth texture.
The most important parts are reaching the proper cooking temperature, allowing the mixture to cool appropriately, and beating it until the sugar crystals become small enough to create that classic creamy texture.
Whether you make it for Christmas, a family gathering, a bake sale, or simply because you have a craving for something sweet, this peanut butter fudge is the kind of recipe that deserves a permanent place in your collection.
One bite is sweet, creamy, nutty, nostalgic—and exactly what an old-fashioned fudge should be.