

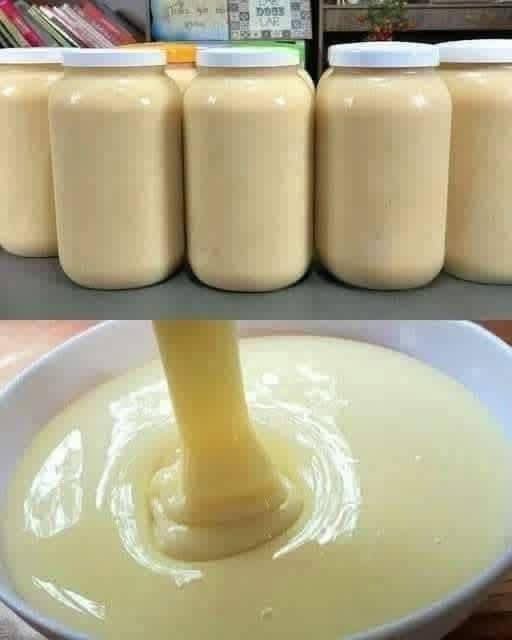
Sugar-Free Condensed Milk
Introduction
Sugar-free condensed milk is a creamy, thick, concentrated milk mixture made without traditional table sugar. It is an excellent ingredient for people who want to reduce added sugar while still enjoying the rich texture associated with classic sweetened condensed milk.
Traditional condensed milk is made by removing a significant portion of the water from milk and adding sugar. In this sugar-free version, the milk is slowly reduced and sweetened with a low- or zero-calorie sweetener.
The result is a thick, creamy, smooth, and versatile mixture that can be used in coffee, desserts, cheesecakes, puddings, ice cream, pies, sauces, and many other recipes.
Recipe Overview
Recipe: Sugar-Free Condensed Milk
Preparation: 5 minutes
Cooking: 30–45 minutes
Cooling: 30–60 minutes
Yield: Approximately 1½ cups
Difficulty: Easy
Nutritional Information
Nutrition depends heavily on the milk and sweetener used.
Approximate nutrition per 2 tablespoons when made with whole milk and a zero-calorie sweetener:
| Nutrient | Approximate Amount |
|---|---|
| Calories | 30–40 kcal |
| Protein | 1.5–2 g |
| Carbohydrates | 2–3 g |
| Fat | 2–2.5 g |
| Added sugar | 0 g |
| Fiber | 0 g |
| Sodium | 15–30 mg |
| Calcium | 50–70 mg |
Important: “Sugar-free” does not necessarily mean carbohydrate-free. Milk naturally contains lactose, a naturally occurring milk sugar.
If you need the lowest possible carbohydrate version, use an unsweetened low-carb milk alternative and check its nutrition label.
Ingredients
Main Ingredients
- 4 cups whole milk
- ½–¾ cup powdered erythritol, allulose, or another suitable sugar-free sweetener
- 2 tablespoons unsalted butter
- 1 teaspoon pure vanilla extract
- ¼ teaspoon salt
Optional Ingredients
For an even richer consistency:
- 2–3 tablespoons heavy cream
For extra creaminess:
- 2 tablespoons powdered milk
For a lower-carb version:
- Unsweetened almond milk or another suitable unsweetened milk alternative
Choosing the Sweetener
The sweetener you use can significantly affect the final texture.
Allulose
Allulose is particularly useful when making sugar-free condensed milk because it behaves more like sugar than many other low-calorie sweeteners.
It tends to produce a smoother, more syrupy consistency.
Erythritol
Erythritol can work, but it may crystallize after cooling.
For a smoother result, use powdered erythritol rather than coarse granules.
Monk Fruit
Monk-fruit sweetener is often blended with erythritol or another sweetener. Check the package because sweetness varies considerably between brands.
Stevia
Stevia is extremely sweet, so only a small amount may be needed. However, using too much can produce a noticeable aftertaste.
Method 1: Classic Stovetop Method
This is my preferred method for creating a concentrated, creamy consistency.
Step 1: Combine the Milk and Sweetener
Pour the milk into a heavy-bottomed saucepan.
Add the sugar-free sweetener.
Stir well.
Place the saucepan over medium heat.
Step 2: Heat Slowly
Warm the milk until it is hot but not aggressively boiling.
Once you see steam rising, reduce the heat to medium-low.
The goal is to gently evaporate water from the milk.
Step 3: Reduce the Milk
Allow the mixture to gently simmer for approximately 30–45 minutes.
Stir frequently, especially toward the end.
The milk should gradually become:
- Thicker
- Creamier
- More concentrated
- Slightly darker in appearance
Avoid high heat.
High heat can scorch the milk and create an unpleasant cooked flavor.
Step 4: Add the Butter
When the mixture has reduced significantly, add:
- 2 tablespoons butter
- ¼ teaspoon salt
Whisk until completely incorporated.
The butter gives the condensed milk a richer, smoother mouthfeel.
Step 5: Add Vanilla
Remove the saucepan from the heat.
Add the vanilla extract.
Stir thoroughly.
Adding vanilla toward the end helps preserve its aroma.
Step 6: Cool
Allow the mixture to cool at room temperature.
Don’t worry if it seems slightly thinner than you want while hot.
As it cools, it will become thicker.
For an even thicker consistency, refrigerate it for approximately 30–60 minutes.
Method 2: Extra-Creamy Version
For a richer dessert-style condensed milk, use:
- 3 cups whole milk
- 1 cup heavy cream
- ½–¾ cup powdered sugar-free sweetener
- 2 tablespoons butter
- 1 teaspoon vanilla
- ¼ teaspoon salt
Combine the milk and cream in a saucepan.
Add the sweetener.
Heat gently and reduce until the mixture becomes thick and creamy.
Stir regularly.
Add the butter and salt near the end.
Remove from the heat and add vanilla.
Cool completely.
This version produces a particularly luxurious consistency.
Method 3: Low-Carb Sugar-Free Condensed Milk
For a lower-carb variation:
Ingredients
- 2 cups unsweetened almond milk
- 1 cup heavy cream
- ½ cup powdered allulose
- 1 tablespoon butter
- 1 teaspoon vanilla
- Pinch of salt
Instructions
Combine the almond milk, cream, and allulose in a saucepan.
Bring to a gentle simmer.
Reduce the heat.
Cook slowly for approximately 30–40 minutes, stirring regularly.
Once reduced, add the butter and salt.
Remove from heat.
Add vanilla.
Cool completely.
The final texture should be thick and creamy.
Method 4: Powdered Milk Method
If you want a thicker condensed-milk-like texture without reducing the liquid for a very long time, powdered milk can help.
Ingredients
- 1 cup hot whole milk
- 1 cup powdered milk
- ½ cup powdered sugar-free sweetener
- 2 tablespoons butter
- 1 teaspoon vanilla
- Pinch of salt
Add everything except vanilla to a blender.
Blend until smooth and creamy.
Add vanilla.
Blend briefly again.
Transfer to a container and refrigerate.
The mixture will become thicker as it chills.
Formation of Sugar-Free Condensed Milk
The most important concept behind condensed milk is concentration.
Milk contains a large amount of water.
When milk is heated gently, some of that water evaporates.
As the water content decreases, the remaining components become more concentrated.
These include:
- Milk proteins
- Milk fat
- Lactose
- Minerals
- Other milk solids
Traditional sweetened condensed milk also contains a large amount of sugar, which contributes to sweetness, thickness, preservation, and texture.
In this recipe, the sugar is replaced by a sugar-free sweetener, while slow reduction provides much of the concentrated texture.
The Science Behind the Recipe
There are several important processes happening during cooking.
Evaporation
Water gradually leaves the milk as steam.
Concentration
Milk solids become more concentrated as the liquid decreases.
Emulsification
Butter contributes fat and helps create a richer mouthfeel.
Cooling
The mixture becomes thicker as its temperature decreases.
This is why you should avoid judging the final consistency while the condensed milk is still very hot.
History of Condensed Milk
Condensed milk became popular as a way to preserve milk before modern refrigeration was widely available.
The basic concept is simple: remove water from milk so that it becomes more concentrated and lasts longer.
Sweetened condensed milk became particularly important during the 19th century.
The addition of sugar helped preserve the product while also creating the thick, sweet ingredient that eventually became popular in desserts around the world.
Today, condensed milk is used in countless culinary traditions.
It appears in:
- Cakes
- Pies
- Fudge
- Ice cream
- Coffee
- Puddings
- Caramel desserts
- No-bake desserts
- Tropical beverages
Sugar-free versions adapt this classic ingredient for modern reduced-sugar cooking.
How to Know When It’s Ready
The condensed milk should coat the back of a spoon.
Run your finger through the mixture.
If the line remains visible for a moment, the mixture is approaching the correct consistency.
Remember:
Hot condensed milk = thinner
Cold condensed milk = thicker
Don’t reduce it too aggressively just because it looks slightly thin while hot.
Troubleshooting
My Condensed Milk Is Too Thin
Return it to low heat.
Continue cooking for another 5–10 minutes, stirring frequently.
Allow it to cool again.
It’s Too Thick
Whisk in a tablespoon of warm milk at a time until you reach the desired consistency.
It Became Grainy
This can happen with erythritol.
Try using powdered erythritol or allulose next time.
For the current batch, gently warm it and blend until smoother.
It Tastes Too Sweet
Add a small amount of unsweetened milk and adjust the consistency.
You can also add a tiny pinch of salt to balance the sweetness.
It Tastes Burnt
Unfortunately, burnt milk flavor is difficult to remove.
If the bottom of the pan has scorched, don’t scrape the bottom into the mixture. Carefully transfer the unburned portion to a clean saucepan.
Storage
Transfer the cooled sugar-free condensed milk to a clean airtight container.
Keep refrigerated.
For best quality, use it within approximately 5–7 days, depending on the ingredients used and refrigerator conditions.
Always check for changes in:
- Smell
- Color
- Texture
- Mold
- Taste
If anything seems spoiled, discard it.
How to Use Sugar-Free Condensed Milk
1. Coffee
Add 1–2 tablespoons to coffee for a creamy, lightly sweetened drink.
2. Sugar-Free Cheesecake
Use it as part of a creamy cheesecake filling.
3. Homemade Ice Cream
Combine it with cream and flavorings to create a creamy frozen dessert.
4. Chocolate Desserts
Mix with cocoa powder and melted chocolate for a rich chocolate filling.
5. Lemon Desserts
Combine with lemon juice and zest for a creamy lemon dessert.
6. Coconut Desserts
Mix with shredded coconut to create a rich coconut filling.
7. Chia Pudding
Add a spoonful to chia pudding for additional creaminess.
8. Pancakes
Drizzle a small amount over pancakes instead of traditional syrup.
Flavor Variations
Vanilla
Add an extra ½ teaspoon vanilla.
Chocolate
Whisk in 1–2 tablespoons unsweetened cocoa powder.
Coconut
Replace part of the milk with unsweetened coconut milk.
Cinnamon
Add ½ teaspoon ground cinnamon.
Coffee
Add ½–1 teaspoon instant espresso powder.
Orange
Add finely grated orange zest.
Almond
Add a tiny amount of almond extract.
Tips for Perfect Sugar-Free Condensed Milk
- Use low heat. Slow reduction creates better flavor and reduces the chance of scorching.
- Stir regularly. Milk can stick to the bottom of the pan surprisingly quickly.
- Use a heavy-bottomed saucepan. It distributes heat more evenly.
- Don’t overcook. Excessive reduction can make the mixture too thick or give it a cooked flavor.
- Let it cool before judging the consistency.
- Choose your sweetener carefully. Allulose generally gives a texture closer to traditional condensed milk than erythritol.
- Use powdered sweetener if using erythritol to reduce graininess.
- Don’t assume sugar-free means calorie-free. Milk and butter still provide calories.
Lovers of This Recipe
This recipe is especially perfect for lovers of:
- Low-sugar desserts
- Creamy coffee
- Homemade ice cream
- Cheesecake
- Keto-style desserts
- Low-carb baking
- Smooth sauces
- Rich milk-based desserts
- Homemade ingredients
If you love traditional sweetened condensed milk but want to reduce added sugar, this homemade version is a fantastic kitchen staple.
Final Method at a Glance
For the easiest version:
1. Add 4 cups milk and ½–¾ cup sugar-free sweetener to a saucepan.
2. Heat gently.
3. Reduce over medium-low heat for 30–45 minutes.
4. Stir frequently.
5. Add butter and salt.
6. Remove from heat.
7. Add vanilla.
8. Cool completely.
9. Refrigerate until thick.
10. Use in your favorite desserts and drinks.
Conclusion
Homemade sugar-free condensed milk is a simple and versatile alternative to traditional sweetened condensed milk. By gently reducing milk and replacing conventional sugar with an appropriate sugar-free sweetener, you can create a creamy ingredient with a rich texture and plenty of culinary uses.
The secret is patience. Keep the heat low, stir regularly, allow the milk to concentrate gradually, and give it enough time to cool and thicken.
Whether you use it in coffee, cheesecake, ice cream, chocolate desserts, lemon treats, or low-carb recipes, this homemade condensed milk can become a useful staple in your kitchen.
Creamy, smooth, versatile, and free from added table sugar — a simple homemade ingredient with endless possibilities.