
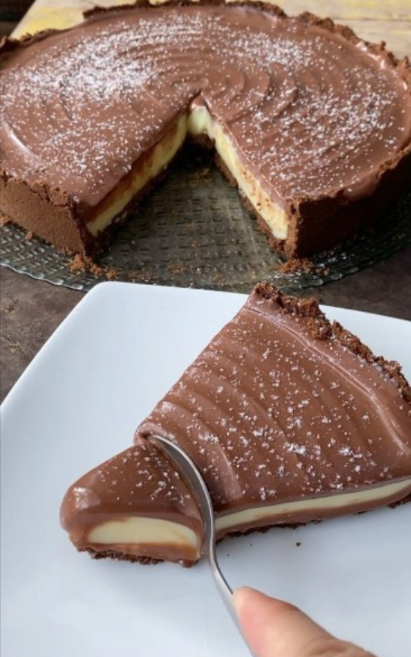
Ingredients
1. The Crust
- 300g Chocolate digestive biscuits (or Oreos, filling removed)
- 100g Unsalted butter, melted
- 1 tbsp Cocoa powder (optional, for extra darkness)
2. The White Cream Layer
- 200g White chocolate, finely chopped
- 100ml Heavy cream (to melt the chocolate)
- 150g Mascarpone or Cream Cheese (at room temperature)
- 1 tsp Vanilla extract
3. The Chocolate Topping (Ganache)
- 200g Milk chocolate, chopped
- 150ml Heavy cream
- 30g Unsalted butter, softened
- Garnish: Flaky sea salt or powdered sugar
Instructions
Step 1: Prepare the Base
- Crush the biscuits into fine crumbs using a food processor or a rolling pin in a zip-top bag.
- Mix the crumbs with melted butter (and cocoa powder if using) until it feels like wet sand.
- Press the mixture firmly into the bottom and up the sides of a 9-inch (23cm) tart pan.
- Chill in the freezer for 15–20 minutes to set.
Step 2: The White Cream Filling
- Heat 100ml of cream in the microwave or on the stove until just simmering (do not boil).
- Pour over the white chocolate and let sit for 2 minutes, then whisk until smooth.
- Fold in the mascarpone and vanilla until the mixture is uniform and silky.
- Pour onto the chilled crust and smooth the top. Refrigerate for at least 1 hour until firm.
Step 3: The Ganache Ripple
- Heat the remaining 150ml of cream until simmering; pour over the milk chocolate.
- Let sit, then whisk in the softened butter for a glossy finish.
- Pour over the set white layer.
- The Swirl: Wait about 5–10 minutes for the ganache to slightly thicken. Take the back of a spoon and, starting from the center, gently rotate the tart (or move the spoon) in a spiral motion to create those beautiful ridges.
- Final Set: Chill for at least 4 hours (or overnight).
Step 4: Serve
- Just before serving, sprinkle with a pinch of flaky sea salt or a light dusting of powdered sugar.
- Pro Tip: Dip your knife in hot water and wipe it dry between each cut to get those perfectly clean, sharp layers.